Knots and Tarps
Knots
This section will help you deal with all of the situations in which you have to attach one thing to another with rope or cord. Knots are easy to practice in Cambridge if one carries around a shoelace or similar stringy material. They can be great fun in boring classes, especially if one ties them to people.
When choosing which knot is appropriate for a given situation, you consider two factors:
- the strength of the knot
- the ease of untying It’s important to remember this second factor, because you want to be able to re-use your ropes the next day! Most of the knots described here are especially easy to untie because they have a built-in method for doing so.
A few other simple concepts can be useful when thinking about knots:
- The end of the rope in which you are tying the knot is called the “running end,” and the other end is the “standing end.”
- A loop at the running end is called a “bight.”
- A simple knot is the “overhand” or “pretzel” knot.
- Almost all knots can be made easier to untie by finishing them with a bight rather than just poking the running end through. The simplest example leads to the “slip knot.” Try tying an overhand knot, but instead of poking the running end through as you normally would, poke a bight through. The result, after pulling everything tight, is a slip knot that is very easy to untie. Note that a slip knot can be tied at any point in the length of a rope because the ends are never pulled through.
- The ridgeline is the thick, long rope that will be tied between two trees and serve to hold up the tarp.
- The p cords are the shorter, thinner ropes that can be used for tying ends of the tarp to various anchor points.

Types of Knots
- Hitches are used to tie the rope to something other than itself or an- other rope.
- Taut-line Hitch (a.k.a. “Knot of Fours”)
- Trucker’s Hitch
- Clove Hitch (a.k.a. “Ghostie”)
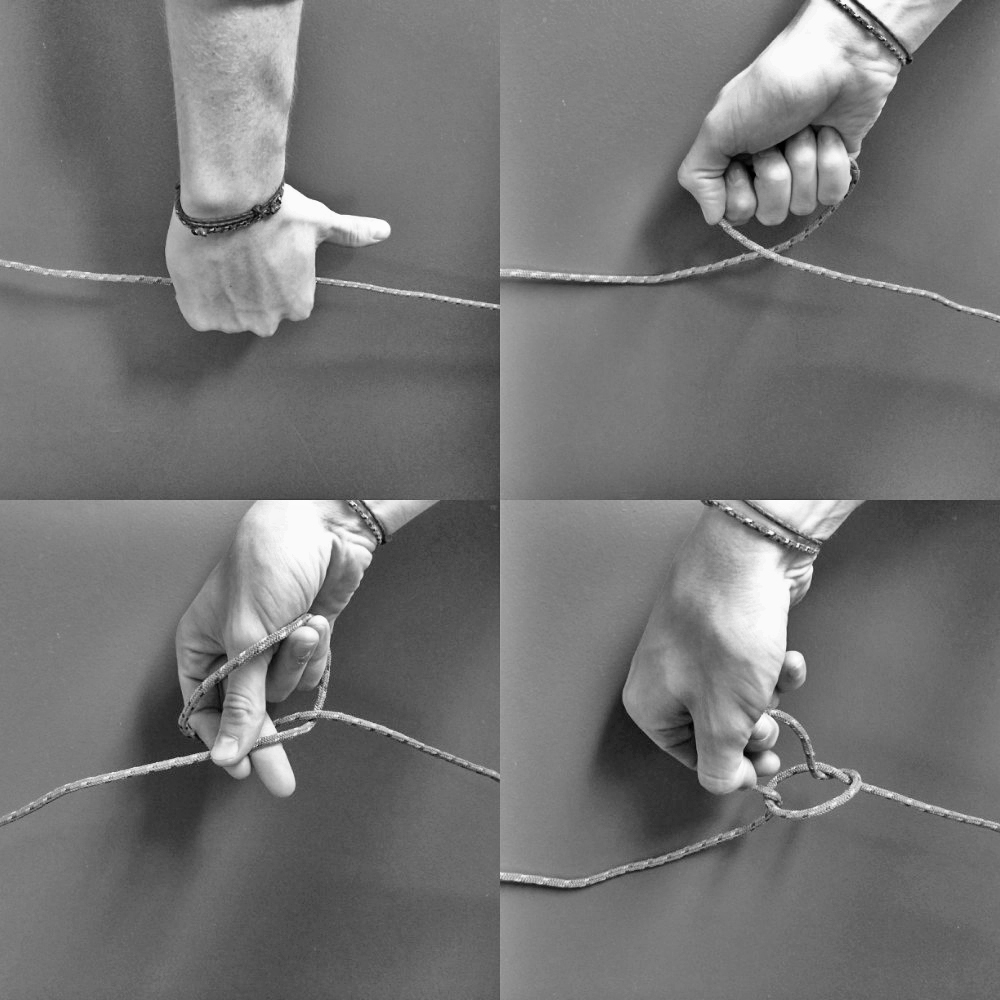
- Bowline
- Bends are used to tie two ropes together.
- Square Knot
- Sheet Bend
- Alpine Butterfly Bend
There are many more cool knots out there, but those few will get you through tarping with flying colors.
Taut-line Hitch (a.k.a. “Knot of Fours”)
- Use case:
- Tying the corners and sides of the tarps to anchors (use this knot around the anchor, like a tree or root or rock)
- Tying the ridgeline of the nylon tarps (trucker’s hitch rips the nylon tarps)
- Advantages:
- You can slide the knot to adjust tension
- Keeps the nylon tarps and their water sealing safe from tears, because it cannot be pulled as tight as the trucker’s hitch
- Disadvantages:
- Can’t be pulled as tight
- Harder to tie and untie than the trucker’s hitch

Trucker’s Hitch
- Use case:
- Tying the ridgeline of the plastic tarps (not the nylon tarps; use the taut-line hitch for those)
- Advantages:
- Easy to tie, untie, and pull tight!
- Disadvantages:
- Careful not to pull too tight on tarps - you don’t want to break the material!
Clove Hitch (a.k.a. “Ghostie”)
- Use case:
- Fastening the tarp cord to the plastic tarps, using a small smooth stone, a handful of dirt, pine cone, whatever is handy
- Advantages:
- Incredibly quick and easy
- Disadvantages:
- As is probably obvious, it isn’t very secure. Shouldn’t be used for holding a lot of strain

Bowline
- Use case:
- Tying the ridgeline around a tree
- Attaching the tarp cord to the grommets (the metal rings around the edges) on the newer tarps, instead of using the clove hitch
- Advantages:
- Reasonably easy to untie
- Disadvantages:
- Can only be tied when there isn’t anything pulling the standing end
Square Knot
- Use case:
- If you have two short p cords, you can make one longer p cord!
- DON’T use it to join two ridgelines
- Advantages:
- You probably already know how to tie this one! It’s what you use to tie your shoes, except without the slipknots (i.e. make two overhand knots)
- Disadvantages:
- Really terrible for making a long ridgeline from two tarp cords because, once it has been pulled tight by a trucker’s hitch over- night, it is often impossible to untie. (“Knot” to be confused with the “granny knot,” which is tied left over right, left over right again; the granny knot is not as strong).

Sheet Bend
- Use case:
- If you want to join two ridgelines to make a longer ridgeline
- Advantages:
- Much stronger than the square knot

Alpine Butterfly Bend
- Use case:
- If you want to join two ridgelines to make a longer ridgeline
- Advantages:
- Your strongest option!
- Very easy to untie, even after being pulled very tight
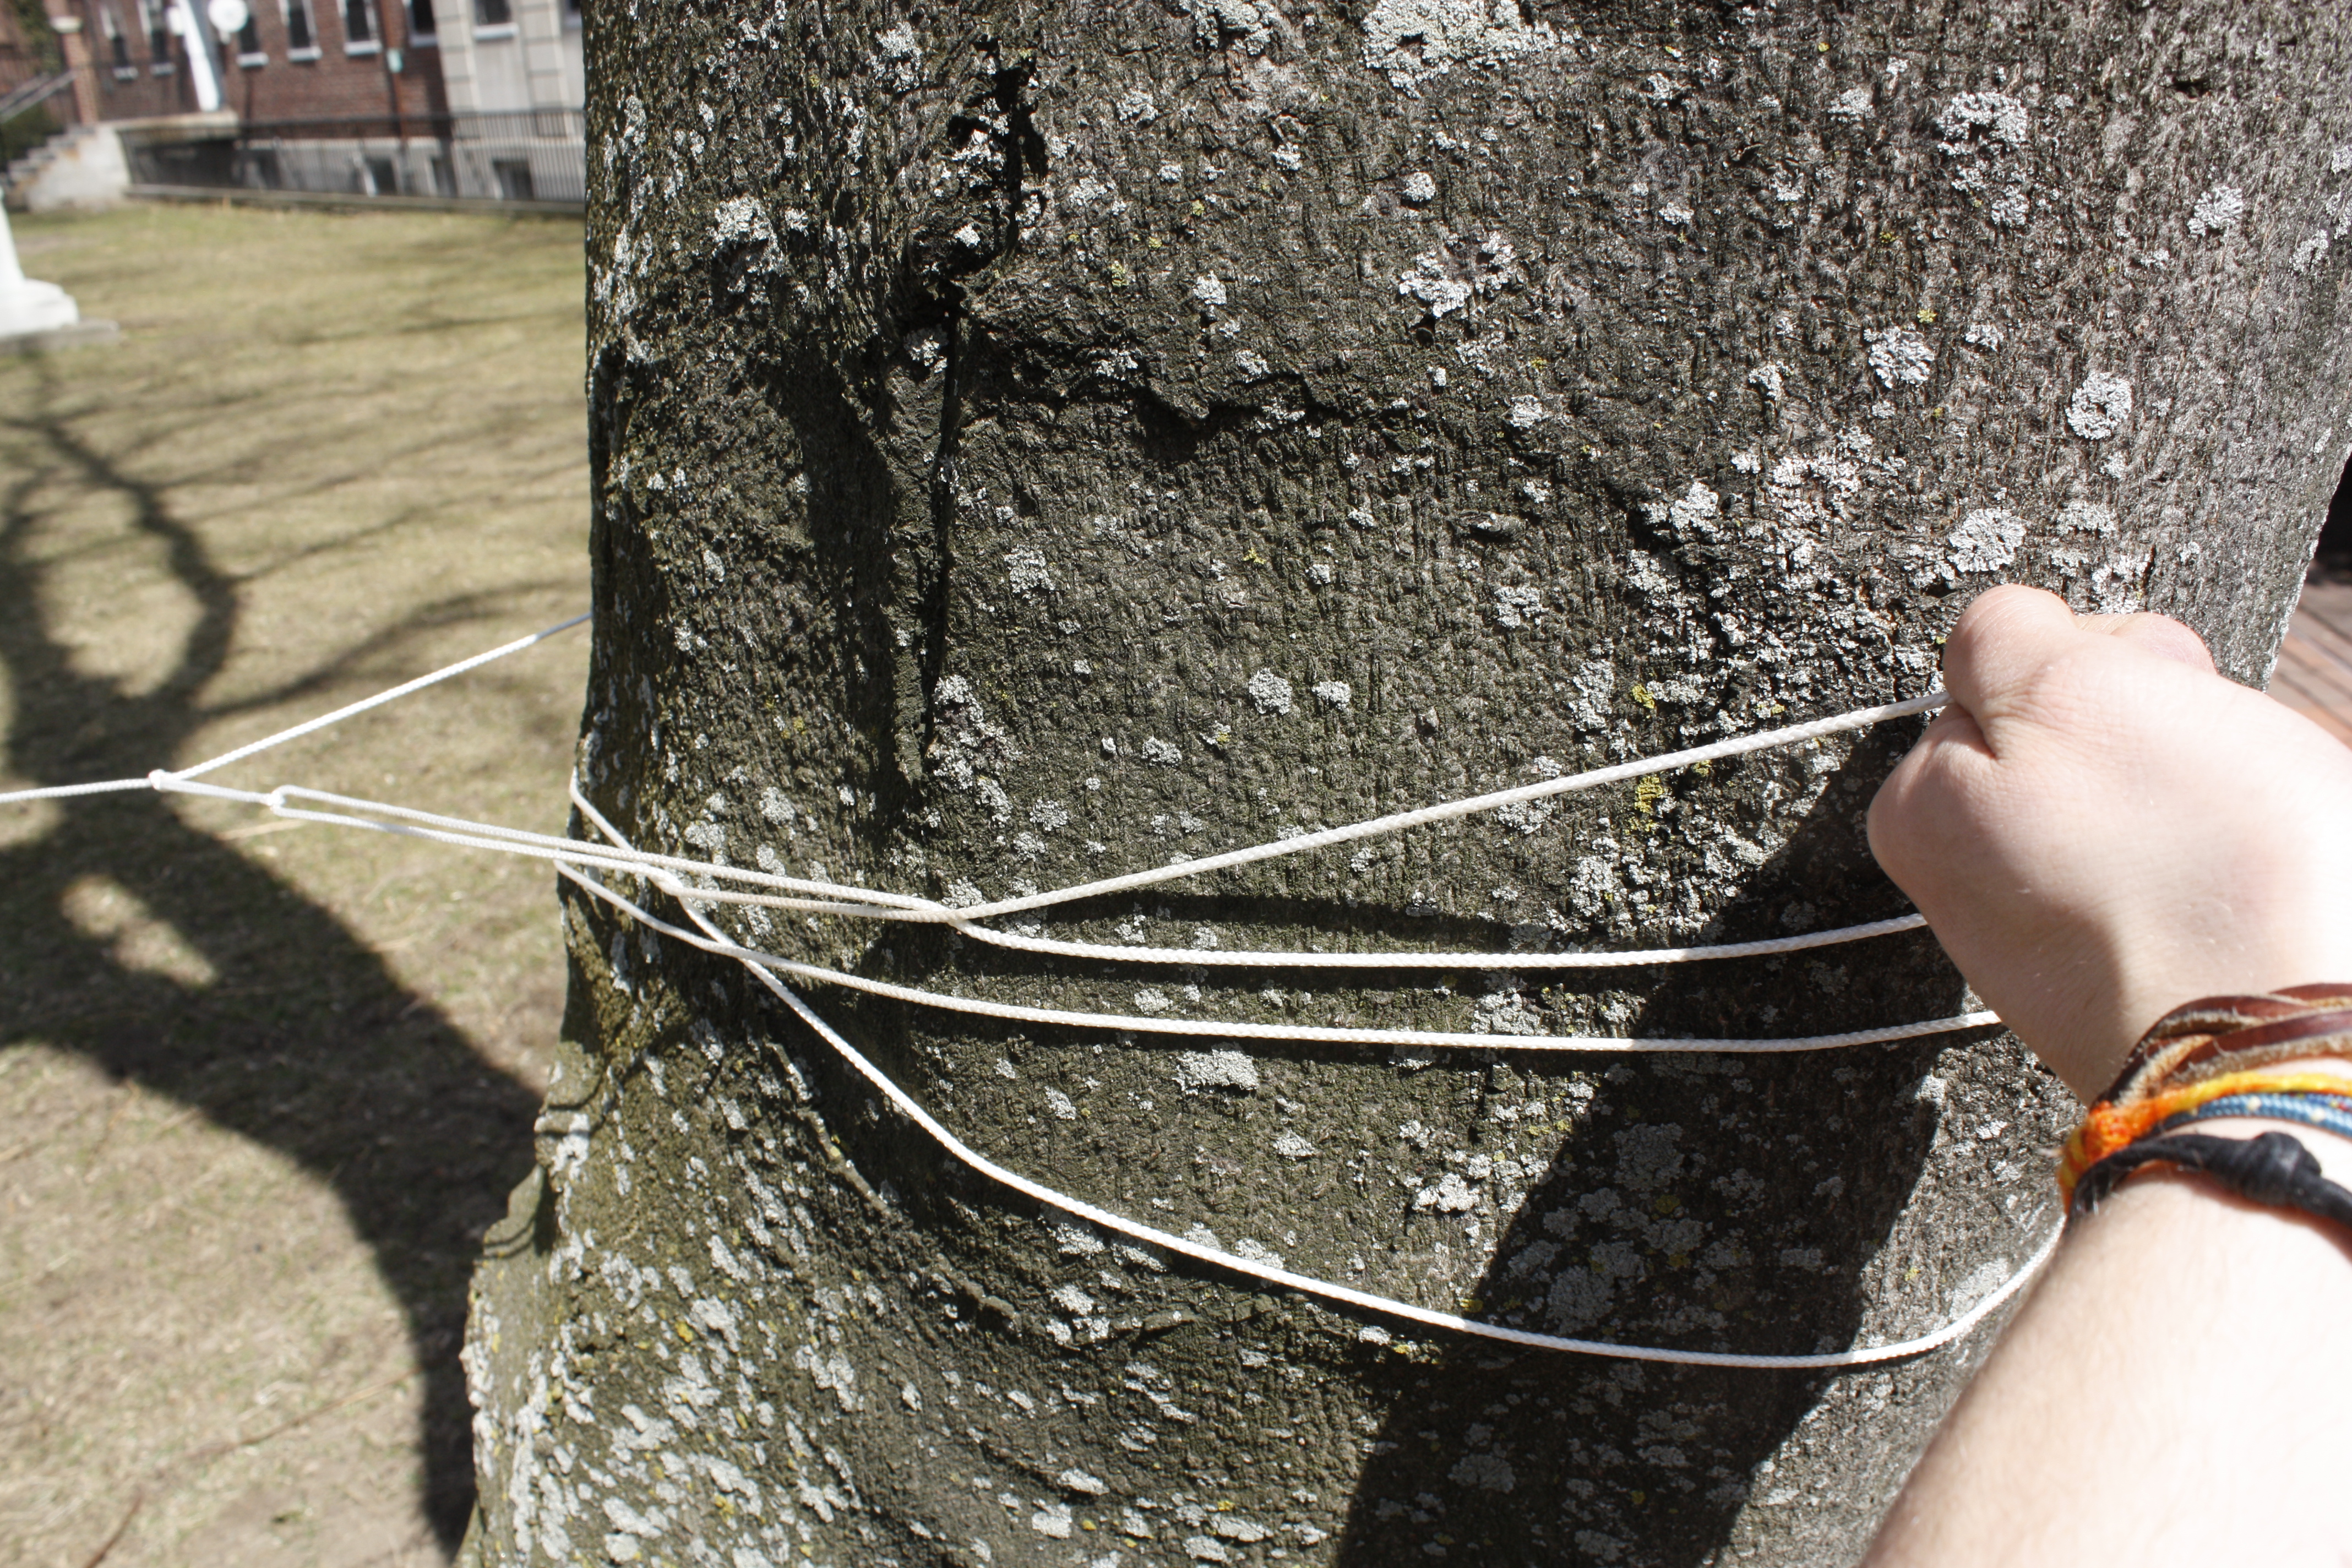
- You don’t actually need tape to hold the two ropes together while tying; that’s just shown below for ease of demonstration
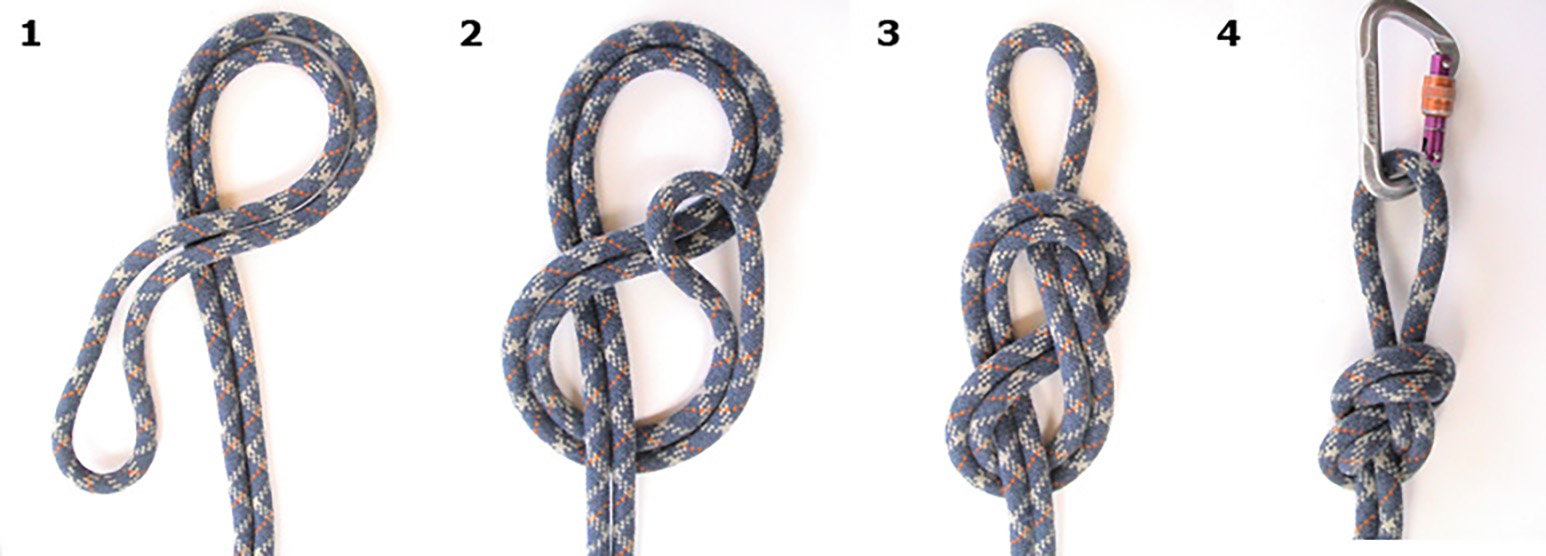
Figure 8 (“Princess”) Knot
- Use case:
- When you bear bag, you’ll hang a carabiner on this knot, and then hang all your smelly items on the carabiner!
Tarps
The most important tarp factor is location. A few extra minutes of searching for a better site can save you an hour of frustration in tarp building and days in recovering from wet sleeping bags and FOPpers. You must be able to visualize three things at each potential tarp site:
- How will your tarp fit into the site?
- Which trees, specifically, will support the ridge line?
- How will people be arranged on the ground under the hypothetical tarp (how many will fit)?
- Are there anchors for the side and corner tarp cords?
- How will things on the ground approach your tarp? - How will water flow around the tarp?
- How will people maneuver in/out/around the tarp? - How will things from above approach your tarp?
- How will rain and wind flow off the tarp?
- Are there any dangerous-looking branches/pine cones/trees that might fall onto the tarp when the windy rain comes? (in particular, look for dead trees or branches near or above the area that may fall on sleeping FOPpers in high wind or rain)
A few general answers: good sites usually have a clear, flat (level and not bumpy) area surrounded by plenty of trees, with at least two sturdy trees approximately opposite each other. (If you have to move any logs or rocks to create a flat area, make sure to put them back in the morning, in accordance with FOP’s minimum impact policy.) The site should not be in any kind of gully, basin, or depression where water will collect.
Other campsite concerns apply, of course: is drinking and cooking water available? Are you far enough from it? Far enough from the trail (at least out of sight)? Far enough from the top of a ridge or peak? Not in a designated fragile ecosystem or watershed area?
[Note: if you camp near an AMC lean-to shelter, always set up tarps and do not use the shelter, except in emergencies; thru-hikers, smaller groups, and groups without tarps have priority there. FOP permitting is granted for use in tarp areas only - in other words, we agree not to stay in shelters. Also, if you camp in an established campground, do use the clearings or tent platforms if available, to avoid further impact to the area.]
How to Put Up a Tarp
Unless your group is very small (fewer than 6, including leaders), you should set up both tarps every night to make sure that everyone stays dry (= safer and happier). It only takes one person sleeping on the rainy edge of a cramped tarp to create a dangerous situation for all. Therefore, you should be super-comfortable setting up tarps.
[Note: never use the plastic tarp as a ground sheet. Not only does this beat up the tarp and put holes in your roof, but if it rains it will create a big wading pool with all your FOPpers floating in it.]
Once you have your site free from sharp obstacles and your tarp, tarp cord, small, smooth stones or leaves and a few FOPpers gathered, you are ready to design and erect the best tarp you’ve ever made. Refer to the following, loose, Eight Steps to a Great Tarp (all italicized words are elaborated in the knot section). These steps outline the construction of a basic A-frame tarp, that can be adapted to a variety of tarp options which are elaborated later:
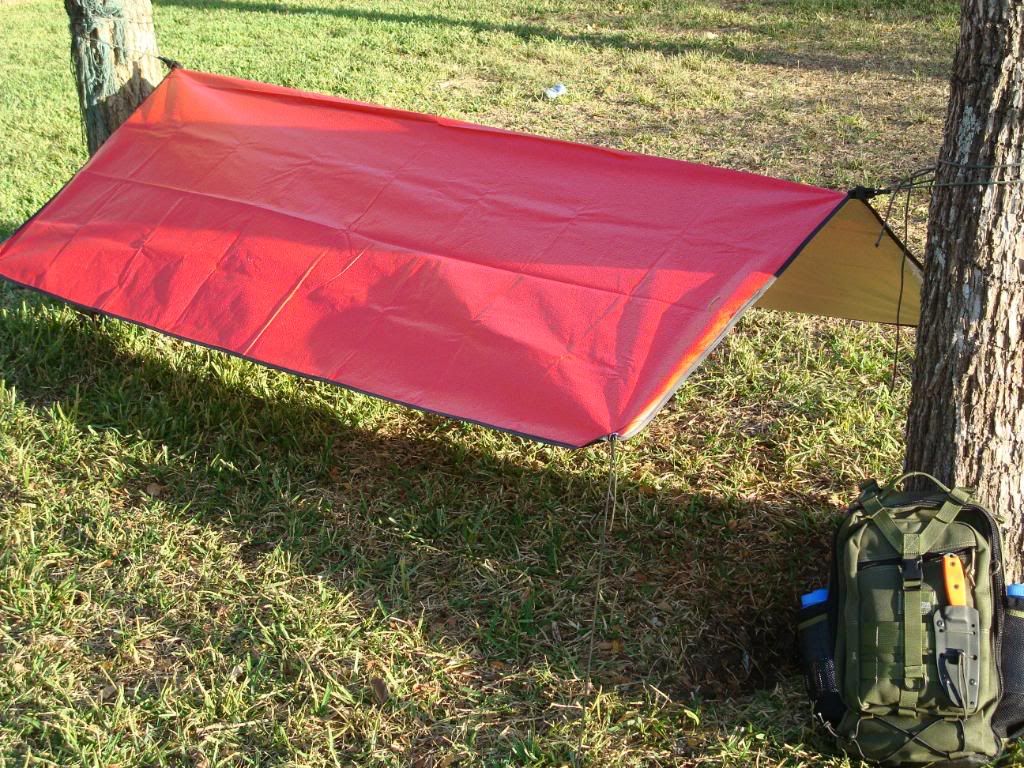
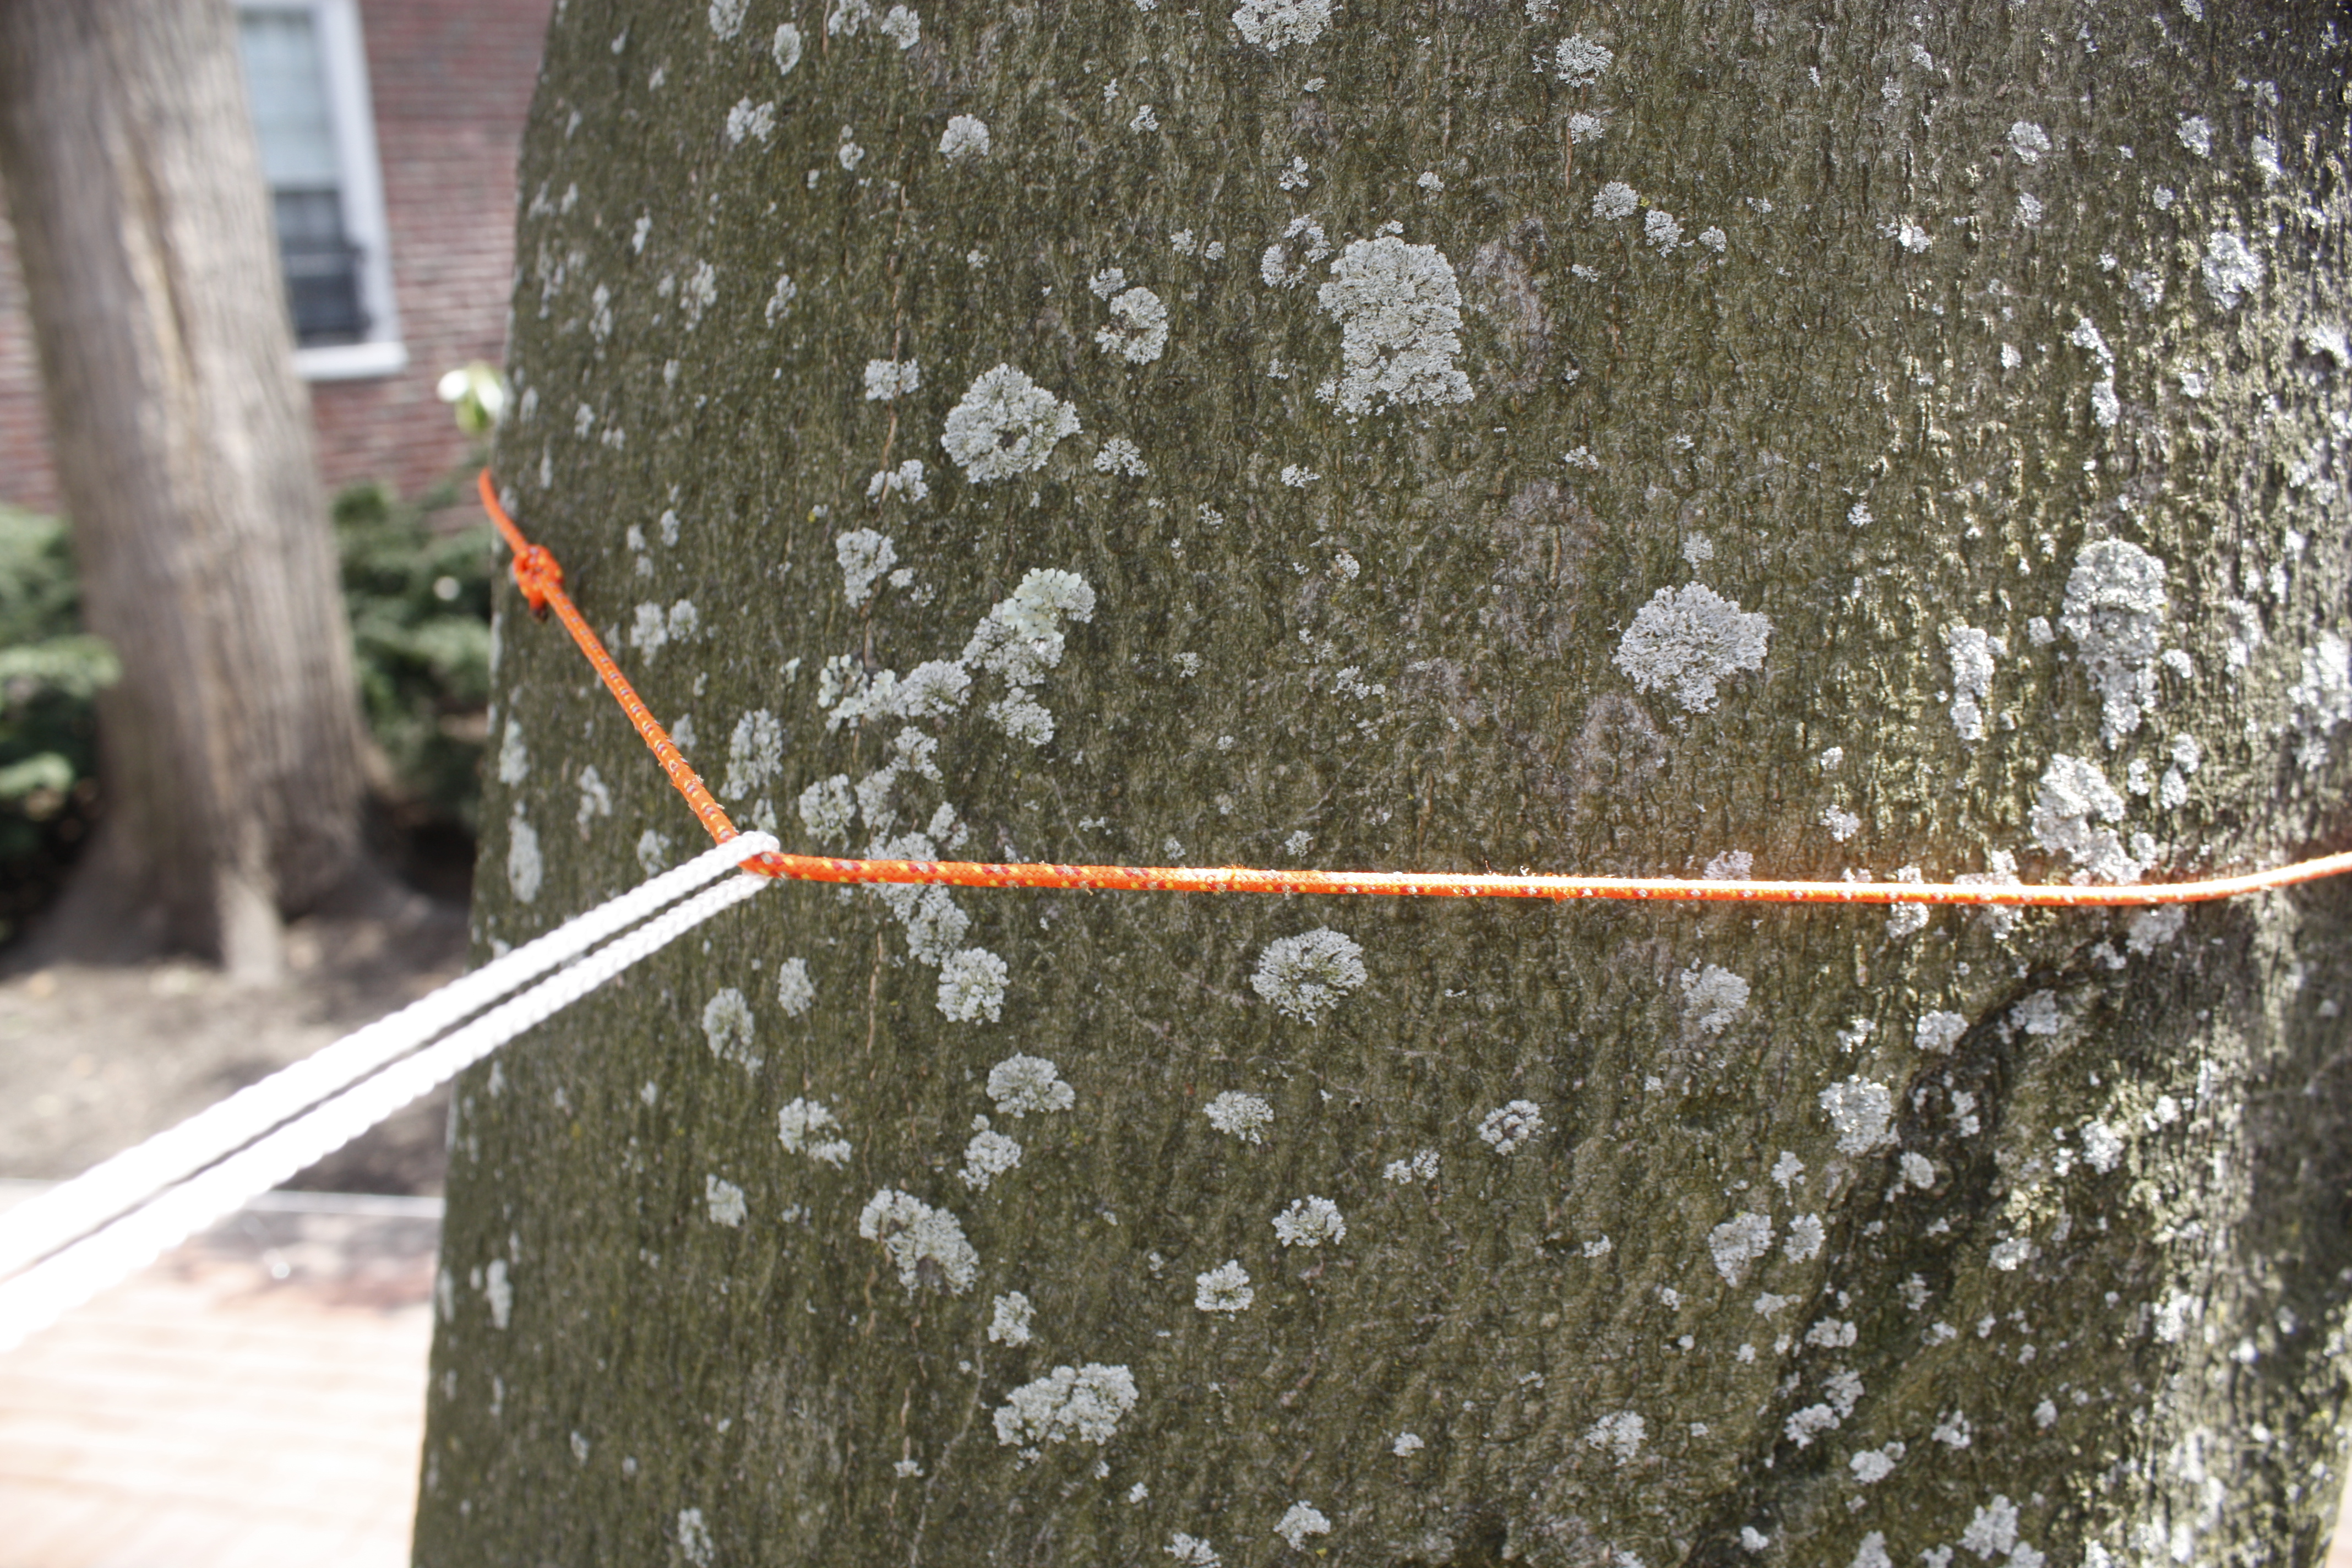
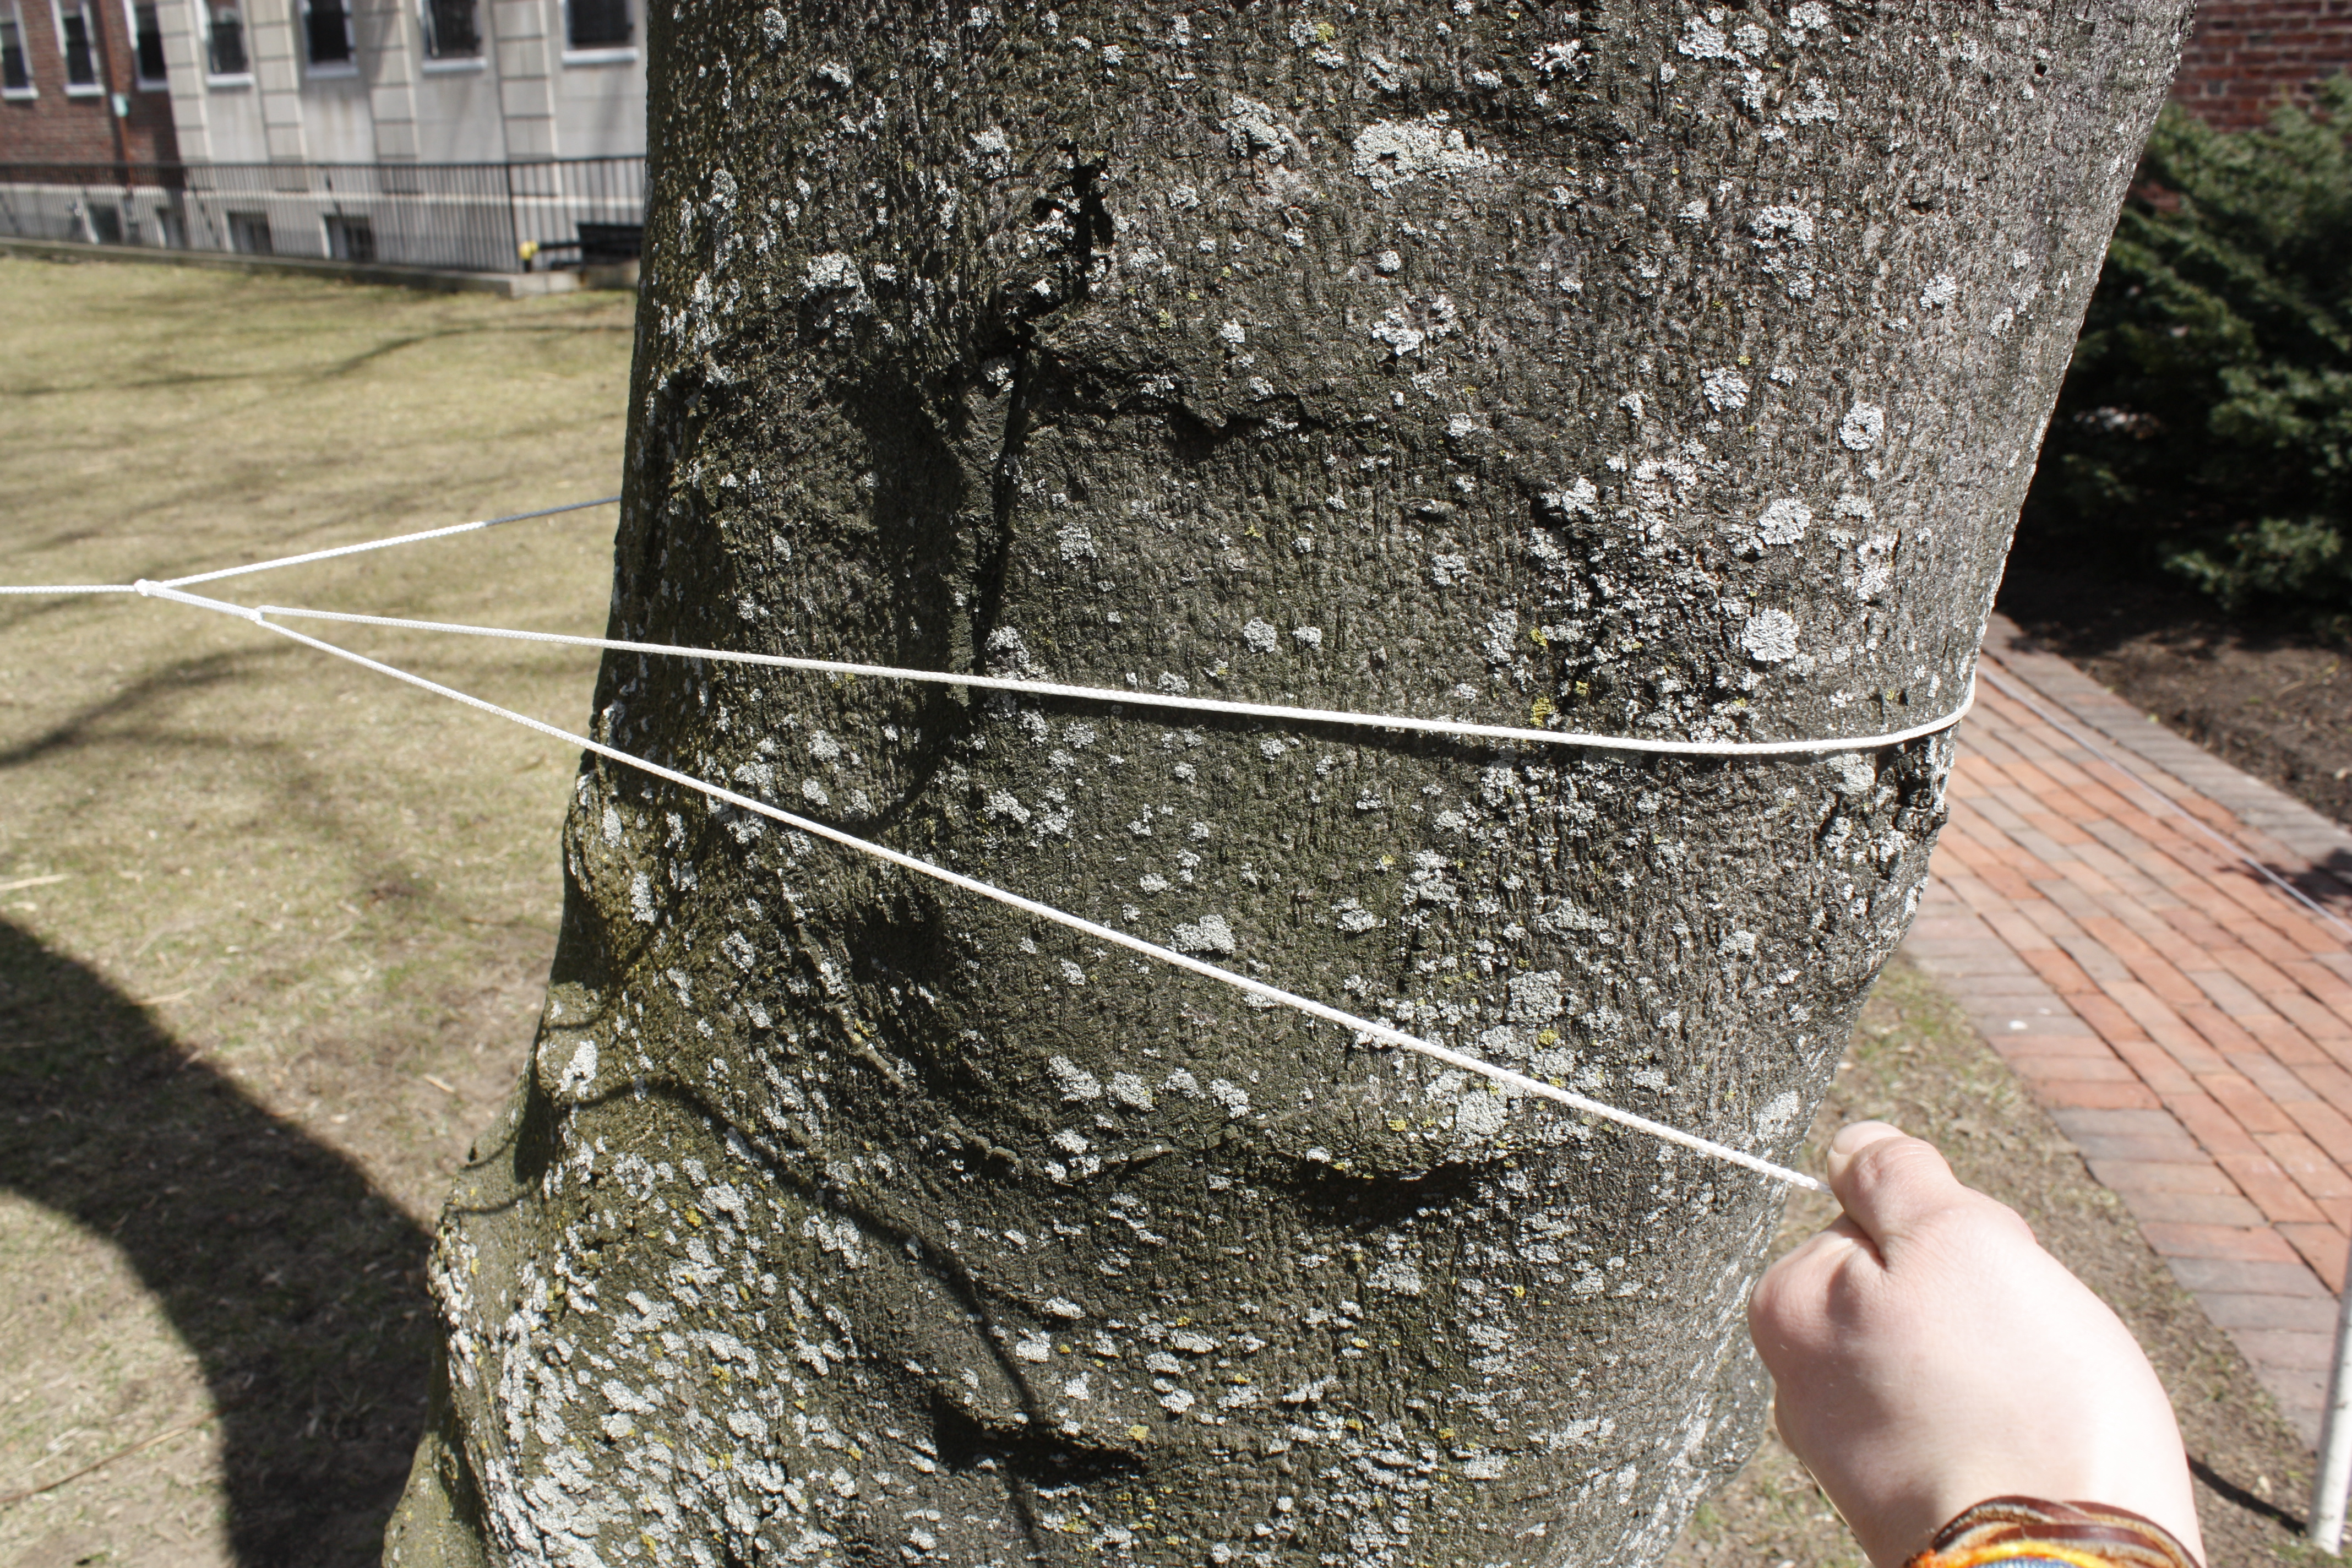
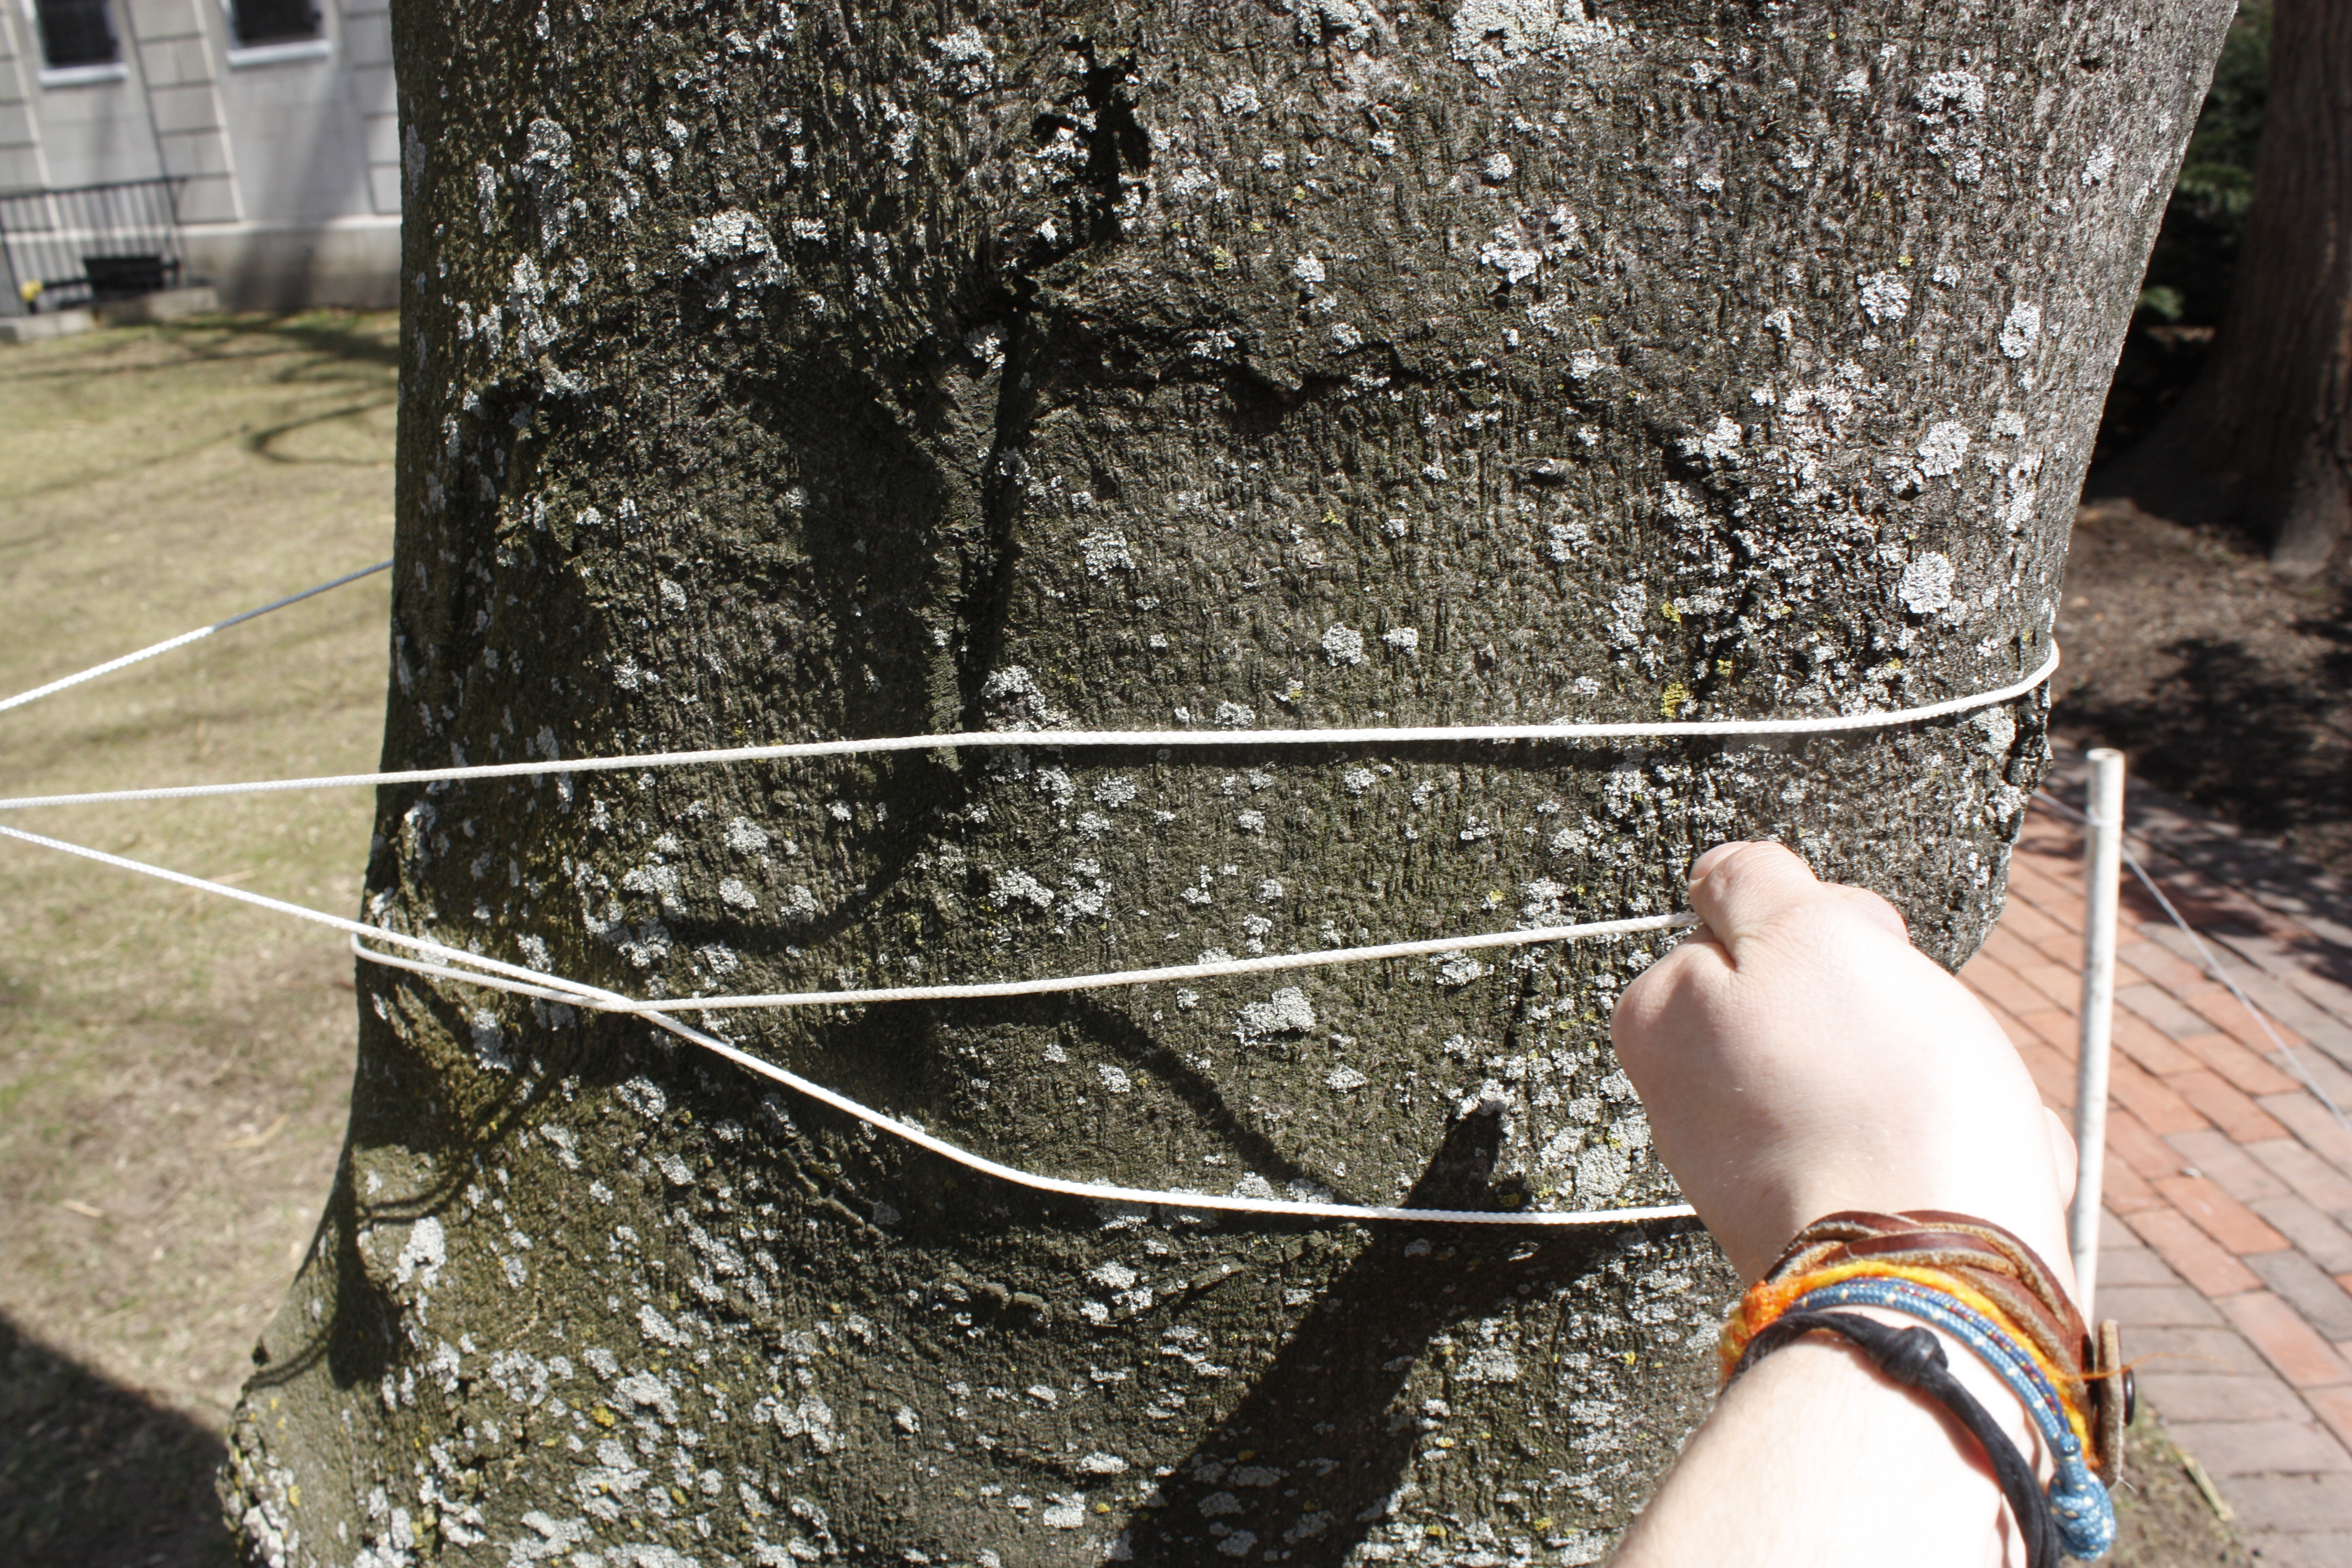
- Ridgeline. The ridgeline is constructed from tarp cord stretched between two solid trees using one bowline to anchor the ridgeline and one trucker’s hitch on the other tree so that any later adjustments in tension or height can easily be made to either or both sides. Unfold the plastic tarp and lay it over the ridgeline.
- Make sure the ridgeline is at an appropriate height. This often appears higher than you may think. 5 feet off the ground is not too high. Don’t forget that the center of it will be at least a foot or two lower when the tarp is pulled tight later. Rain can also weigh down a tarp, making it sag further.
- The farther apart the trees are, the higher you will need to string the ridgeline, because it will inevitably sag when the tarp pulls down on it. If the trees are far apart, you may need to connect two lengths of tarp cord using your favorite bend.
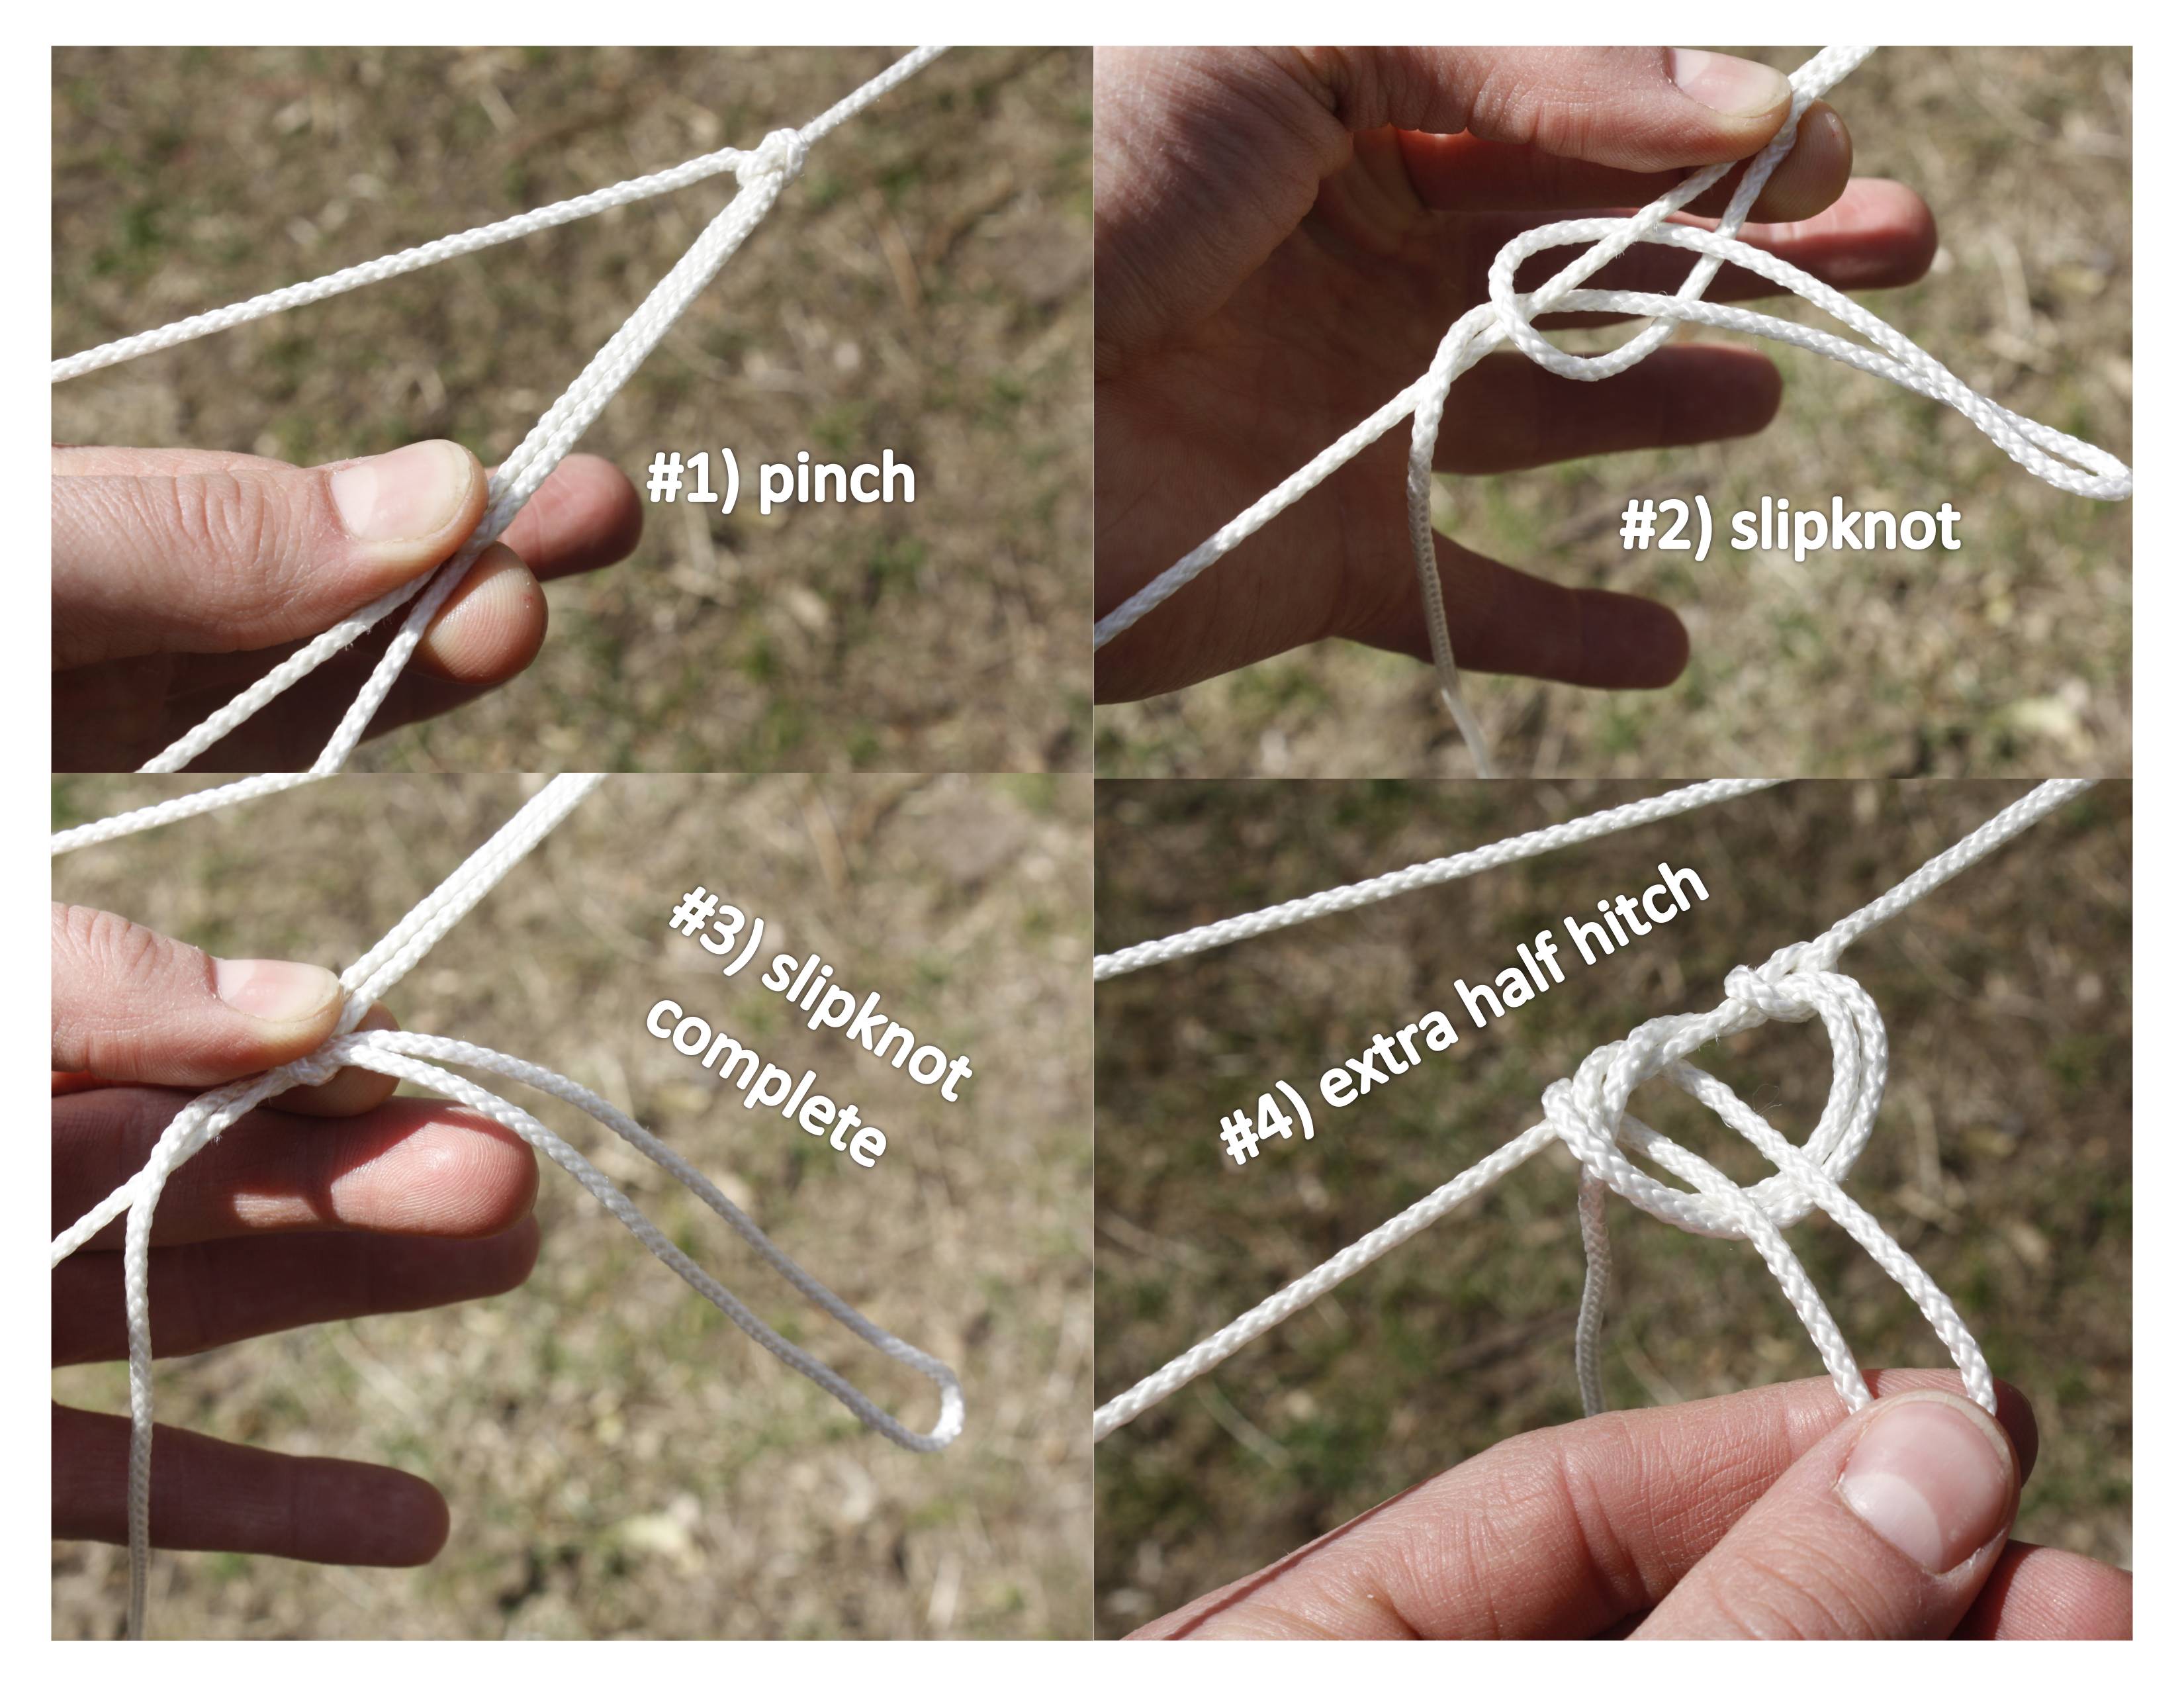
- Have FOPpers help! Grab one or two, and help you to haul on the running end of the pulley you’ve formed with the truckers hitch. Have another pinch the turn in the trucker’s hitch and tie it all off with a slipknot!
- Tarp cords. You must attach the remaining tarp cord to the tarp, to be used in the next two steps to achieve the distinctive “Great Tarp” shape. Using stones (smooth, rounded stones are less likely to rip the tarp) or leaves and clove hitches, attach one cord to each of the four corners and one or more cords to the long sides of the tarp. Note that, on the plastic tarp the location of the “corners” is flexible - if you attach cords to the actual corners of the plastic, you may end up with a tarp that is too wide, which means it will be difficult to avoid the dreaded “Saggy Tarp Syndrome” (see below).
- Corners first. Starting with opposite corners (or one person on each of four corners) and very little tension, attach the remaining end of each of the corner cords to the closest anchor you can find with a taught-line hitch so that the cord makes equal (135 degrees) angles with the two nearest sides. Gradually tighten the hitches at the corners until most of the sag in the tarp sides is gone. Remember you are striving for an ‘A’ frame shape with pretty steep sides. The sides closest to the ground should still have 1-2 foot clearance.
- Anchors refers to anything you can tie a rope to that will stay where it is. Examples include trees, roots, logs, stumps, and big rocks. It is possible to poke sticks into the ground like tent stakes, but be extremely careful. These anchors are often not strong enough and are dangerous once people start trying to hammer them in with big rocks.
- Then sides. When the corners are all pretty tight and the tarp is still more-or-less centered across the ridge line, tie the rest of the attached tarp cords to more anchors (again, with taught-line hitches), so that the cords pull straight out away from the tarp. These side cords, when pulled tight, should rid your tarp of most of its sag.
- Adjust. With the goal of a wrinkle-free, sag-free, totally awesome tarp in mind, continue adjusting the tension in all of the cords. To get rid of wrinkles, tighten the cords that run perpendicular to the wrinkles. To get rid of sag, try some of the following: switch anchors so that the new ones are closer to the tarp and give it a steeper angle; raise the ridgeline; tighten corner cords; tighten side cords; attach new tarp cords to problem areas (to do this, you must first release the tension in the tarp by loosening most of the previously tightened cords); see the “advanced technique” section, below.
- Iterate. If the tarp looks smooth, sleek and sag-free, but the ridge line is now six inches off the ground, or is still six feet in the air, you will have to loosen all ground cords and adjust the ridgeline. Then collect $200 and go back to Step 3.
- Test. When the tarp looks bomber, it’s a good idea to pretend it is raining and try to figure out where rain would go if it landed on different parts of the tarp. Would it race down off the ridgeline but then start making big pools near the sides? When pools form, the weight of the pool will act to make the tarp sag more and create bigger and bigger pools, eventually causing at least one flooded sleeping bag. If in doubt, you can always create test rain with a water bottle. Eventually, you will get closer and closer to the point where you sit back and…
- Smile.
Now you can put the easy finishing touches on the tarp:
- Tie bandannas or wet clothes to any tarp cords or ridgelines that might trip or decapitate, to increase their visibility.
- Starting from the middle, line up the personal tarps, sleeping pads and sleeping bags under the tarp. [Again: never use any big tarp as a ground tarp. It will create a big wading pool with all your sleeping FOPpers floating in it, and it will wear and tear the tarp that you need for overhead protection.] If your site is not quite level, make sure everyone’s heads are uphill, and layer the personal ground tarps so that the one at the highest point overlaps underneath the next lower one, which goes underneath the next one, etc. You can even put small sticks or stones under the uphill edges of your personal tarp. The idea is to keep ground water running under the personal tarps rather than onto them.
- Make sure that NO part of the ground-sheets sticks out from under the tarp shelter - any exposed groundsheet will collect and channel water under the tarp.
Advanced Techniques (“Pro Tips!”)
You can make castles out of mere plastic sheets. Following is a brief collection of possibly useful tips for difficult tarp situations.
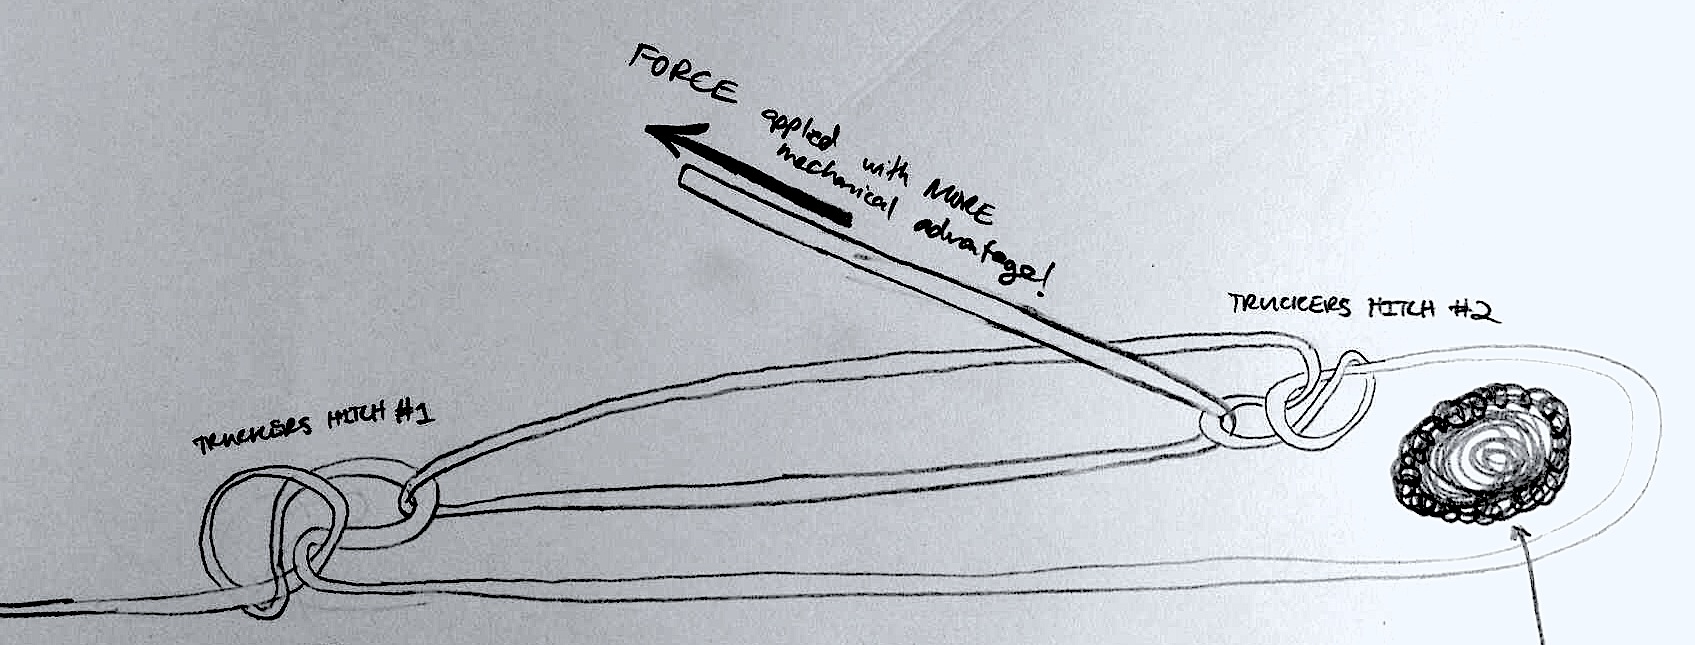
- In order to achieve greater tension and tautness in the ridgeline, and thereby reduce sagging, set up a pulley system using not ONE, but TWO or MORE (!) trucker’s hitches! Rather than simply passing the running end through the original trucker’s hitch (#1), add a second hitch (#2) on the same line, and loop the running end through both hitches before applying tension. Note that you rarely need this, only use if you have an extremely long ridgeline or need very high tension for some reason.
- If you’re finding yourself running out of ridgeline, try tying an extra p-cord around the tree as an anchor. That way, you don’t need to use precious ridgeline to go all the way around!
- If you’re finding that “pinching” to tie the second slip-knot on the ridgeline is not working, try friction-wrapping the running end around the tree 3 times
- “Booster Points”: When you just can’t get rid of that sag, one option is to attach another tarp cord at the lowest point in your sag. The other end of that tarp cord should go to the highest point you can find - usually an overhead tree branch. When you pull tension on the cord, the sag turns into a peak! [Readjust all the other cords accordingly.]
- Another way to boost is to come from underneath. Use a stick or hiking pole with a cup on the top to support a sagging ridgeline. The cup prevents the pole from tearing through the tarp.
- “A” vs. “L”: Whereas the standard “A” shape tarp works best for most situations, there may be sites which force you to consider an asymmetric tarp, called an “L,” or “lean-to.” This shape is actually better suited for movement on the inside, with heads at the short, high side, and legs on the long, low side. The problem is that sag is difficult to avoid on the long side. However, an “L” tarp with a booster point on the long side may get you out of some tight spots.
- “Double Ridgeline”: Occasionally you may not be able to find good booster trees, or you may need to boost an entire side. Provided you have enough trees, a double ridgeline may come in handy. This technique usually works best when you use three trees: one tree for one end of both ridgelines, and the other two trees for the other ends. This triangle approach allows the tarp between the ridgelines to form a drainage channel. Sometimes called the “Stealth Tarp.”
- “No-tree Tarps”: A situation that often arises on the last night when you are camp-ing at the trailhead in an open field, or some other treeless clearing. Spend some time searching for good, strong branches that have some kind of “Y” shape (make sure they are already separated from their trees), or use two big branches to make an “X”. Then string your ridgeline over the branches, anchoring it in TWO places on each end.
- “Awnings”: usually you will have a few extra personal tarps because they are much wider than people are. If well secured, these can be used as extensions of your main tarp, providing bonus rain and wind flaps for the people on the ends.
Overall, remember that even when the going gets rough, any action based on the “hmmm…looks like it won’t rain tonight” theory is bound for disaster. Even though all FOP leaders know that It Will Rain, even the best of us can be tempted by the tarp devils into succumbing to tarp mediocrity. Take pride in your tarps. Convince your FOPpers to take pride in their tarps. If you can successfully teach them a few knots and a bit of technique, always emphasizing the “why” over the “what,” a short week’s work should leave you with ten swell tarps and a bunch of swell kids. Take a picture of each tarp for your design portfolio. They were your homes.
Care/Packing/Cleaning
Along with taking pride in your tarps, you should take care of them. Both the nylon and plastic tarps are precious FOP items which must be respected. In general, keep in mind that FOP cannot buy new tarps every year. Every tear put in the tarps this year is another duct tape patch next year’s groups will have to deal with, and tarps made entirely out of duct tape may be aesthetically pleasing, but they have little practical value. Here are some tips to help you care for the tarps:
- Avoid using sharp stones or sticks in your clove hitches (“ghosties”).
- Duct tape both sides of a rip or hole as soon as possible.
- Only use a trucker’s hitch on the ridgeline.
- Remove all sticks and stones that may accumulate, and untie all knots in the tarp cord, before folding and rolling up the tarps each morning (a clean, dried tarp is also a lighter tarp to carry).
- Make sure all of the p-cord is accounted for when you are taking down the tarps.