Switch
While switch trip leaders need to be concerned with the same issues as other leaders - safety, group dynamics, food, equipment, minimum impact, etc. - there are a few additional concerns to be considered. Being on the water adds a whole new dimension in terms of safety, teaching, group dynamics, logistics, and route planning.
Logistics of the Switch
The leaders of different trips that are making a canoe exchange need to consult one another during Pre-FOP to arrange specific switch times and contingency plans in case of unexpected delays or injuries. It is imperative for leaders to recognize that another group is depending on them to arrive at the designated switch point at a specific time so that both groups can continue with their trips. However, switch leaders should allow each other some leeway with regard to switch times. The safety of a FOP group must under no circumstances be compromised for the sake of sticking to a schedule.
As with hiking crossovers, time spent between groups at the switch should be kept to a minimum: while it is fine for FOPpers to ask about the lake or discuss the hike, group interaction is not encouraged because FOP is designed to provide a bonding experience within each group and contact between groups can sometimes hinder progress towards that goal. At the same time, the exchange of information between leaders concerning the condition of the water or the trails is vitally important. To this end, take a few minutes to meet with the leaders of the other switch group and ask about campsites and the route - after all, you will be hiking or paddling the same stretch that they have just finished, only in reverse. They are a great resource!
Canoeing Guidelines
(See Policies and Procedures.)
- Always assume that some and perhaps all of your FOPpers may not have been canoeing before and may not be comfortable on the water.
- Leaders should review and be prepared to teach basic canoeing skills, canoe safety, and care for the equipment. The teaching outline is a good checklist.
- Carefully assess the water and weather conditions before setting off. It is against FOP policy to paddle in moving water, and against FOP procedure to paddle on a white-capped lake. Night paddling is also prohibited.
- When making assignments to canoes, leaders should take account of paddling skills, swimming abilities, and strength of participants. A group of canoes travels at the speed of the slowest canoe, so keeping boats balanced in strength will result in less frustration for those lagging behind or itching to move faster. Furthermore, experienced canoeists might relish the opportunity to pass on some of their skills to those new to the discipline. Pairing paddling partners can be a useful tool for group dynamics on a switch trip; it gives FOPpers the opportunity to get to know one other FOPper more closely.
- Split the group gear (food, stoves, fuel, etc.) so that if the entire contents of a canoe were lost, it would not be too devastating for the trip. At a minimum, make sure that the stoves are in separate canoes, and don’t put all the matches in one boat.
- Loads should always be secured extremely well so that losing gear would never be an issue. The best way to do this is to attach the hip belt of each pack around one of the thwarts.
- Never intentionally capsize a canoe on a FOP trip or training trip.
- Participants must wear shoes (no sandals) at all times to prevent injuries.
- Lifejackets must be worn and secured tightly at all times on the water.
- When on the water, leaders should designate a lead and sweep canoe. These two canoes should be equipped with whistles and should also be within shouting distance. The lead canoe should not be passed, and the sweep boat should not pass any boat.
- Each canoe should maintain comfortable verbal contact with the one ahead and to its rear. A good guideline is one to two boat lengths distance between canoes. Visual contact with the rescue boat is essential, especially when traveling around points or bends in the lake.
- Canoes must stay close to shore (30 feet where possible). Paddling close to shore keeps one better protected from waves and wind. And in the event of an emergency, it is good to be near solid ground.
- One canoe should be designated as the rescue boat. It should have a leader in the stern, and a competent paddler in the bow. The rescue boat should carry the medkit and stay near the middle and on the lakeside of the group.
- The rescue boat must always be the first on and last off the water.
Sample Teaching Outline
This section provides a good checklist of things to cover when teaching canoeing, as well as providing one possible structure. As with all teaching, the more hands-on a presentation can be, the better, although it is not feasible to send everyone off into boats before establishing certain basics. The following is a sample teaching outline:
- Discussion of traveling on water
- Same principles of safety as group travel on land but with additional concerns: cold water, wind, obstacles in water both moving (speed boats) and non-moving (submerged rocks), less control over boat makes it easier to get separated, etc.
- Importance of water safety: introduce FOP lifejacket and shoes policy.
- Importance of staying as a group:
- Lead and sweep canoes
- Distance (30 ft) from land
- Rafting up on the water as a method of keeping together during breaks from paddling. Why? Accident prevention!
- Explain that all of these procedures are implemented to prevent accidents from happening. Explain what to do in the event of an accident/capsize: this should cover the use of paddle signals for communication, the role of the rescue boat and what others should do in a rescue (namely, to go to shore).
- Stand-up, hands-on presentation: How we’ll travel and what we’ll use:
- Explain that there is certain basic terminology which makes teaching canoeing easier.
- Parts of the boat: Where do you sit?
- Parts of the paddle: Where do you grip the paddle? What is a proper grip?
- Emphasize care for this equipment: we don’t drag canoes on land, nor do we run boats ashore when pulling into land. Paddles should not be used to dig into the ground.
- Stretching exercises: Before doing any paddling - even on land - one should stretch the necessary muscles. The stretches can vary from day to day and can come from FOPpers themselves. Stretching can be made more fun by involving partners. The best stretches for canoeing emphasize torso rotation. So…try the CANOE DANCE!
- Fitting a paddle for each individual: There are many ways to do this. One good technique involves standing the end of the paddle blade on your toe (which is good care for equipment to begin with) and looking for the grip to come between your chin and nose.
- Basic strokes:
- Forward stroke, back stroke, steering strokes: Explain purpose and have people practice on land.
- An effective way to teach the strokes is to have the FOPpers stand in shallow water so they can both actually feel the power of the stroke and get used to having their feet wet.
- Draw, pry and sweeps: Not as useful to practice on land, but worth trying to get a feel for.
- Loading equipment: Works best as a show-and-tell. Both people carrying canoe into water should get feet wet. One person should hold floating canoe while other loads packs and straps them in with the hip belts secured around the thwarts.
- Are we ready to go yet? NO! Be sure that everyone is wearing their lifejacket and has it snugly done up. This should always be the last check before getting on the water. A “buddy” system is a good way to get the FOPpers to look out for themselves and for each other. Teach that the practice of checking lifejackets (as well as other safety concerns like wearing shoes in the boat) is not one to be taken lightly; it requires constant vigilance/observation on your part throughout the day.
- Rescue canoe must be the first boat in and the last boat out of the water. All the other boats should then follow the example of the rescue boat. Some ideas for teaching the strokes before getting under way:
- “Rafting up” once all canoes are in the water.
- Play “follow the leader.” This is a great way to get a sense of FOPpers’ paddling ability and it also enables the leaders to re-pair paddling partners if necessary. Let FOPpers experience the different feeling between paddling a fully laden canoe, and paddling one with only them in it.
- Demonstrate strokes again in the water, emphasizing this time how the bow and stern paddlers work together in combination:
- Forward stroke in bow and J-stroke in stern for propulsion
- Draw in bow and sweep in stern to turn the canoe away from stern paddler’s side
- Pry in bow and J stroke with heavy pry to turn canoe away from bow paddler’s side
- Both paddlers doing a draw on same side to move boat sideways.
Rest breaks should provide the opportunity for further practice of turning strokes as canoes attempt to raft up.
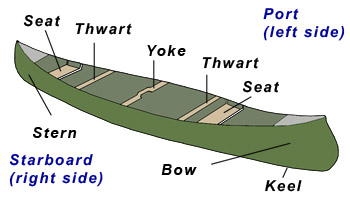
Canoe Equipment
The parts of the paddle and canoe are provided to help one teach proper strokes. Teaching these terms before tackling the actual paddling can make the strokes come easier and make it easier for leaders to troubleshoot later.
Parts of the Canoe and Paddle

Canoe Rescues
Take precautions: Canoes can easily capsize, especially when inexperienced paddlers engage in unsafe practices. Prevention cannot be stressed enough. Most capsizes on flat water occur in docking and taking off from shore, so it is important to teach proper technique. A canoe that is breached on a rock has only one point of contact and is far more likely to capsize; for that reason and because it is bad for the canoe itself, such practice is strongly discouraged. When paddling, kneeling will give the canoe more stability by lowering the center of gravity. It is advised practice in wind or when performing a crossing. Capsizes may occur due to lack of communication between the bow and stern paddlers. Any movement or shift of weight - such as to get some gear out of a pack - can disrupt the balance in the canoe and should be done very carefully, preferably when canoes are rafted together.
The most important factors to be aware of if a canoe does capsize are: 1) the rest of the group, and 2) the people in the capsized canoe. If one canoe has capsized, it is probably an indicator that the same thing could happen to any of the canoes.
If a canoe does capsize, the rescue boat should take charge of the situation. The other canoes should be sent to the closest feasible point on land to prevent another capsizing, although a second canoe may be needed to help in the rescue process. The leader(s) in the rescue boat should check on the condition of the paddlers in the water. Then the leader(s) should decide on a type of rescue to enact. The goal is a safe rescue that will not cause a second boat to capsize. Speed is secondary. As such, often the safest option is to have the paddlers in the water swim their capsized canoe to shore. An alternative which may be quicker or more feasible for slightly longer distances is to tow the capsized canoe to shore with the rescue canoe. Boat-over-boat rescues are more dangerous, but may be necessary when far from shore, such as during a crossing. Again, preventative measures should be taken so that canoes stay close to shore at all times.
To perform a boat-over-boat rescue, the people in the capsized boat should hold onto their paddles and swim to one end of the overturned boat, while the rescue canoe should paddle to the opposite end of the capsized canoe. The bowperson of the rescuing canoe should turn around and face the sternperson, and then the two of them should lift the capsized canoe over their gunwale. This will be much easier if the paddlers in the water push down on their end, and if the two in the rescue canoe turn the capsized canoe sideways slightly to break the seal of air created by the capsized canoe. It may be necessary for those in the water to untie gear from their boat if it is hindering the rescue.

The two rescuing paddlers should pull the overturned boat across their boat between them until it rests with both its ends out of the water.

Then they should roll the boat over and slide it back into the water, making sure not to hit the paddlers in the water. Lastly, the rescuing paddlers should pull the two boats together parallel and stabilize the righted boat as the paddlers pull themselves (one at a time) out of the water and into the canoe. These two canoes should join the others on shore.
Strokes
This section is intended to provide a minimum background on the paddling strokes. The strokes are divided into power strokes, steering strokes, and turning strokes. For any effective stroke, virtually all of the paddle blade should pass through the water.
Power Strokes
These strokes are intended to move the boat forward or backward. They are intended for propulsion and not for directional correction.
Forward Stroke
This may seem like a fairly obvious canoeing stroke, but good technique is essential to improve power and minimize fatigue. Despite popular conceptions, the ideal forward stroke derives its power from a torso rotation rather than a pulling of the arms, as the muscles of the upper body are considerably stronger than those in the arms. Tired arms at the end of a day provide an indication that a paddler is using the wrong muscles. The paddler’s arms should be extended in a flexible, relaxed manner. Straighter arms force the paddler to rotate her shoulders before placing the paddle in the water. The paddler’s hip nearest to the paddle may also rotate slightly.
- Reaching forward, the paddler places the whole paddle blade in the water and rotates the shoulders to propel the paddle through the water.
- When going through the water, the paddle shaft should maintain an angle close to vertical (approx. 70 degrees). For that to happen, both hands must be away from the body and over the water.
- While it’s important to get good extension reaching forward in initiating the stroke, strokes need not be excessively long ; three quarters of a stroke’s power occurs in the first five to seven inches.
- The paddle should exit the water at or just past the hip.
Reverse Stroke
This stroke is used to propel the boat backward, often used when pulling away from shore or in rafting up. A couple reverse strokes can also bring a quickly moving boat to a halt. This is useful to prevent your boat from hitting objects like rocks, other boats, shore, etc. The stroke follows the same principles as the forward stroke, but with the direction reversed. Again, getting a good reach before initiating the stroke is important, as is the torso rotation.
Steering Strokes
These strokes complement the forward stroke in allowing two paddlers to propel the canoe forward in a straight line without requiring paddlers to change sides. Equally powerful strokes in the bow and the stern will tend to turn the boat away from the side that the sternperson is paddling on. This is because the sternperson’s strokes are further from the boat’s center of rotation (pivot point). Definitely unaesthetic, the practice of changing sides leads to inefficient paddling and increased instability (due to more frequent shifts of weight). The following strokes all push the stern back “in line” and are very useful for steering, which is primarily the job of the sternperson.
Rudder
The rudder is the most rudimentary of steering strokes, involving turning the front face of the blade (called the “weak face” since it does not pull water on the stroke) out from the stern and using it to rudder the boat back to a straight course. The paddle can be held in such a position at the end of a forward stroke for a moment as necessary. Note that when the front face of the blade turns out from the stern, the thumb of the grip hand (top hand) turns up. The rudder is less efficient than the “J” stroke.
“J” Stroke
The “J” stroke is more elegant than the rudder, both more aesthetically pleasing and more fluid, leading to a more efficient recovery. It is also probably the most difficult stroke to learn for novice paddlers. It involves turning the back face (the “power face”) of the blade out from the stern at the end of a forward stroke, pushing water away from the canoe.
- Begin with a forward stroke. Towards the end of the stroke, before the blade reaches the hip, roll the thumb on the grip hand down towards the water.
- As the paddle rotates so that the back face of the blade turns to face away from the canoe, the lower hand should not turn much. This requires a loose grip on the paddle shaft with the lower hand.
- By turning the torso back to face front, push water away from the canoe as the blade continues back and diagonally away.
- The stroke can be adjusted to make a small or large correction to the direction of motion.
These strokes are used for quicker maneuvering of the canoe than the steering and forward strokes allow for. For most efficient turning, combinations of turning strokes involving the bow and sternperson are most effective, as outlined in the sample teaching outline.
Draw
This stroke is used to move the boat to the “onside” of the paddler (i.e. the side the paddler is paddling on) or toward the power-face of the blade. Reaching directly out from the seat with the paddle shaft vertical and adjacent to the seat, the paddler puts the strong face of the blade into the water facing directly towards the paddler. With both hands over the water, the paddler applies force to bring the paddle in towards the canoe. At the end of the stroke, recovery can be made by sliding the blade back along the edge of the boat and out of the water. An alternative (more difficult) recovery technique is to turn the paddle blade 90 degrees and slice through the water out from the canoe back to the starting position for another draw stroke.
Pry/Pushaway
This stroke looks like a draw done backwards, designed to move the portion of the boat at which the paddle is located toward the “offside” of the paddler (i.e. the side he or she is not paddling on). The paddle enters the water right next to the paddler with the blade facing out. The shaft should be fairly vertical. Both arms are used to push the blade out away from the canoe.
Forward Sweep
The forward sweep is a wide, shallow stroke in which the shaft is held low, with force exerted on the power-face. The goal is to create an arc of 90 degrees as far away from the craft as possible. In the bow, the arc should begin at the front of the boat and end when the blade is directly out from the body. This has the opposite turning effect as a draw. In the stern, the arc should begin directly out from the body (with maximum extension) and end at the stern. This has the same turning effect as a draw done by the sternperson. In both the bow and stern, a larger arc can be made, although the turning is only really effective during the first 90 degrees of a large sweep from the bowperson and the last 90 degrees of a large sweep from the sternperson.
Back Sweep
The back sweep follows the identical principle of creating a wide, shallow arc in the water but with the direction reversed. Note though that in tandem canoeing, the reverse sweep should follow the same 90 degree paths as the forward sweep for the bow and stern. (Great for the abs!)
Remember that good canoeing does not involve memorizing and perfecting a repertoire of strokes, but rather it requires one to learn how moving the blade about in the water at different points around the boat affects the boat’s movement. It involves learning how other forces - wind, waves, weight, moving water - affect the boat, and it involves learning the different shapes that the boat can present to the water (think of looking up from below). In all, it involves learning that sitting in a floating bathtub with an old snow shovel could someday be the most graceful moment of your life.
Tips
- Trade wet shoes if basecamp is involved in your switch.
- Bring extra compactor bags
- Bring whistles