Maps and Navigation
Maps
FOP uses a variety of different maps, all of which have a few things in common. They are all topographic, representing 3 dimensional space in a 2 dimensional format.
In the Margins
- The title of the map and North are at the top of the map.
- The date the map was made and the date of revisions.
- Longitude and latitude.
- Adjacent quadrangles.
- Magnetic declination (the deviation of the compass reading from True North).
- The contour interval.
- The key (or legend) including descriptions of types of roads.
- A scale to determine mileage.
The Map Itself
In the center of the map you will find the representation of the terrain. Again, there are standard methods for recording the information. The maps we issue have a standard color code (which may not be the same for non-USFS maps):
- Black ink denotes man made objects (buildings, roads, trails, power lines, bridges, etc.)
- Blue ink denotes water features (streams, springs, seasonal streams, swamps, lakes, rivers.)
- White areas denote clearings.
- Green areas denote vegetation.
- Brown ink denotes elevation changes (contour lines).
- Purple ink denotes updates made since the map was made (based on aerial photographs).
Reading Contour Lines
Contour lines, as marked in brown ink, indicate a change in elevation. The vertical distance between two contour lines is the contour interval and is different for different maps. However, a few things are generally true about contour lines:
- Lines that are close together indicate steep slopes or cliffs.
- On gentler slopes, lines will be farther apart.
- At ridges, the lines will form a V or U pointing downhill.
- In valleys, the V will point uphill.
- Circles denote summits.
Refer often to your map. As a leader, you should know where you are at all times. Keep your map handy. It is wise to pull out the map in the morning and construct a mental picture of the terrain you will cover that day. Taking the time to orient yourself and your group will give everyone an idea of what’s in store and will also reduce the number of times you have to answer the question “Do you know how far we’ve gone so far?” or “Do you know how much farther it is?” Knowing exactly where you are also becomes critical in an emergency situation. If a storm comes up or if you need to send out for help, knowing your exact location is essential.
Estimating Travel Time
For a group of hikers with loaded packs, the standard equation is:
- 2 miles per hour on flat ground
- Add 1 hour for every 1,000 feet up
- Add 1/2 hour for every 1,000 feet down
FOP Groups are generally slower than this. 1 mile per hour is a more conservative estimate for FOP.
Compasses
The basics of compass usage are surprisingly simple and can be mastered quickly, and once learned they will certainly become an invaluable skill for any hiker, canoer, or outdoor enthusiast.
Essentially a compass is nothing more than a magnetized needle, floating in a liquid, and responding to the Earth’s magnetic field consequently revealing directions. Over time compass markers have added features which make compasses work more harmoniously with maps and also more beneficially as stand alone tools.
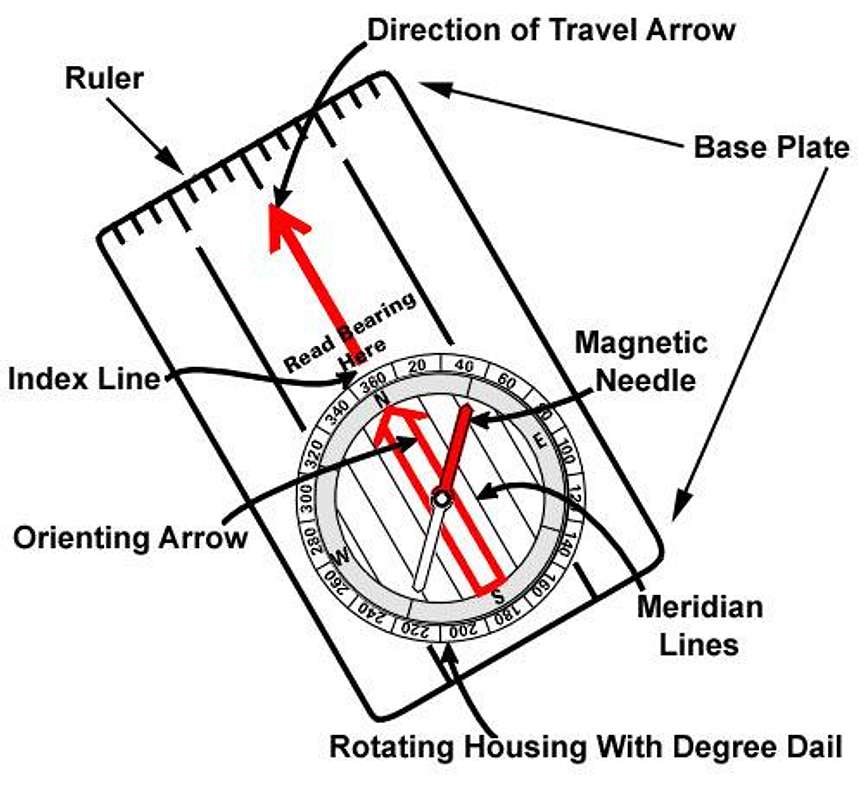
Let’s begin our introduction to compasses by taking a look at a standard, modern day, orienteering compass, and identifying its parts. As the figure below shows, an orienteering compass typically consists of three main parts: a magnetic needle, a revolving compass housing, and a transparent base plate. The magnetic needles north end is painted red and its south end white. The housing is marked with the four cardinal points of north, east, south, and west and further divided into 2 degree graduations indicating the full 360 degrees of a circle. The bottom of the rotating housing is marked with an orienting arrow, and meridian lines. The base plate is marked with a ruler (and/or USGS map scales), an index line (bearing reading line), as well as a direction of travel arrow.
The Compass Rose
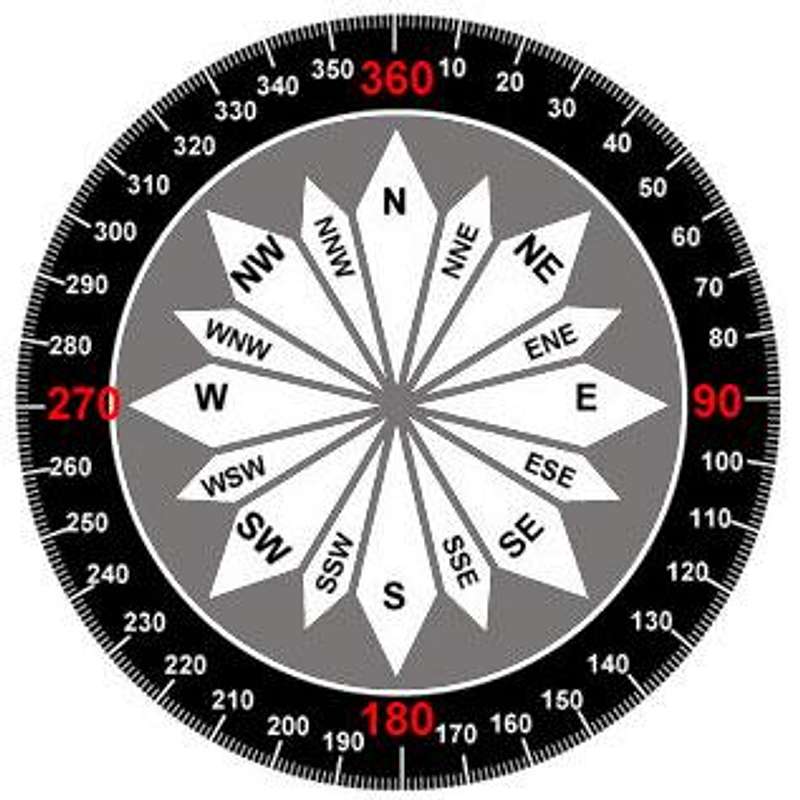
Before beginning to use a compass one should familiarize themselves with basic directions and their degree readings. The four cardinal points are all 90 degrees apart, with East being at 90 degrees, South at 180 degrees, West at 270 degrees, and North at 360 degrees (or zero degrees). Identifying the degrees by 45 degree increments gives us the eight principal points of direction namely North (O or 360 degrees), North East (45 degrees), East (90 degrees), South East (135 degrees), South (180 degrees), South West (225 degrees), West (270 degrees), and North West (315 degrees). Memorizing the eight principal points can help one to instinctively associate directions and bearings, and help eliminate errors when taking bears (bearings are explained in the next section). For example if you are told that a landmark is SE of your location, you know that is 135 degrees, or conversely if you know you need to go West but you calculate the bearings as 90 degrees you will instinctively realize the bearing is wrong, as West is at 270 degrees (turn your compass around, you have committed the classic 180 degree error). You may have heard directions given in terms like NNW or ESE, those types of directions are a result of distinguishing degrees in 22.5 degree increments resulting in the 16 traditional compass directions. Typically the eight principal points are sufficient to know.
The FOP Compass Crash Course
Compasses are great tools for navigation, but realistically, on a FOP Trip, the most common situation you’ll need your compass for is to orient your map. When you orient a map, you position it so that north on the map actually points north, and in this way you can look in a particular direction for a landmark and know exactly where it is on the map to determine your position. To orient your map, follow these steps:
- Lay out the map on a flat surface.
- Adjust your compass for the magnetic declination (the difference between true north and magnetic north) in your region: find in one of the corners of the map a figure which shows the cardinal directions, with an arrow pointing slightly east or west of true north, labeled magnetic north. Place your compass on this figure with the solid arrow (on the baseplate of the compass) above the compass rose lining up with the arrow for true north. Then twist the compass rose so that the two red lines (the orienting arrow) are parallel with the arrow for magnetic north. Considering where FOP trips take place, you will always be twisting the compass so that the orienting arrow is pointed slightly west from north.
- Place your adjusted compass on the map with the edge of the baseplate lining up with the north-south meridians on the map.
- Slowly turn the map and compass together until the compass needle is “boxed” by the orienting arrow (often referred to as putting “red Fred in the shed” since the northern end of the needle is red and the orienting arrow is a box).
- Now the map is oriented to match the real world. Look around for landmarks you see (mountains, valleys, rivers) and then try to find them on the map, and then deduce your relative position.
Advanced Compass Use: Bearings
One of the most important uses of a compass is taking, and following a bearing. A bearing is the direction from one spot to another, measured in degrees, from the reference line of north; in other words it’s one of the 360 degrees of the compass rose. To take a bearing hold the compass in front of you with the direction of travel arrow pointing at the object of interest. Hold the compass level and steady, and rotate the housing dial, until the orienting arrow lines up with the red end (north end) of the magnetic needle, all the while keeping the direction of travel arrow pointed at the object. Read the number indicated at the index line, and that is your bearing. Now to follow that bearing to the object, let’s consider an example. Say you want to travel to a large rock outcropping on the horizon, which is currently visible to you, but which may leave your field of vision when you walk into a dip, or when pending clouds come in or the sun sets. Let’s say your bearing on the outcropping measured 315 degrees (or NW). Assuming you still have the direction of travel arrow pointing at the rock outcropping, and have not changed the 315 degree bearing setting on the dial, walk forward keeping the magnetic needle over the orienting arrow (by rotating your body, and not the dial), and the straight line course (as pointed out by the direction of travel arrow), will lead you to the rock outcropping. En route, when the rock outcropping leaves you line of sight pick out an intermediate landmark along the bearing, so you don’t have to constantly look down at your compass. Walk to the intermediate landmark, and repeat with another landmark until you reach your destination.
Once you arrive at the rock outcropping, what bearing do you use to return to where you came from? Actually you don’t need any other bearing besides the 315 degrees already set on your compass. To return, just point the direction of travel arrow at you, instead of forward, and then rotate your body until the orienting arrow lines up with the red end (north end) of the magnetic needle, and then walk straight ahead while keeping the magnetic needle over the orienteering arrow (just as you did in going to the rock outcropping). That is the easy way to backtrack, of course you could also calculate your back bearing by subtracting 180 from your forward bearing of 315, and set the 135 degree (SE) difference at the compasses index line and then use the same body rotating method mention earlier, only this time you’d have the direction of travel arrow pointing your way.
Try this. Take your compass to an empty parking lot or field and mark a spot. While standing at the spot set your compass to any bearing between 0 and 120 degrees, pick a landmark along the direction of travel and take 15 steps toward it. Stop, add 120 degrees to your initial bearing, pick out a landmark along that bearing and walk another 15 steps toward it, stop and once again increase your bearing by 120, pick out a third landmark and again walk 15 steps. Notice you have arrived back at your original starting location.
Let’s return to the example above where we took a 315 degree (or NW) bearing on a rock outcropping, and lets suppose that enroute to the outcropping we encounter an obstacle which we must go around thus forcing us to deviate from our straight line course. If you are lucky enough to be able to pick out a landmark that’s along the bearing, and also on the other side of the obstacle, you have nothing to worry about, just go around the obstacle and get back on course by reaching the landmark and aligning the red end of the magnetic needle over the orienteering arrow, and continue walking.
If you can’t see a landmark along your course, there are a couple of other methods you can use to get around the obstacle and get back on your original course. One method is to have a member of your party navigate the obstacle, and then treat them like a landmark. One he has cleared the obstacle talk him into position along your original bearing. Also have him take a back bearing on you to confirm he is in indeed back on course. He can do this by pointing the direction of travel arrow of his compass at himself and then turning his body so as to align the red end of the magnetic needle over the orienteering arrow, and he should notice that you are along the bearing, if not he needs to move left or right.
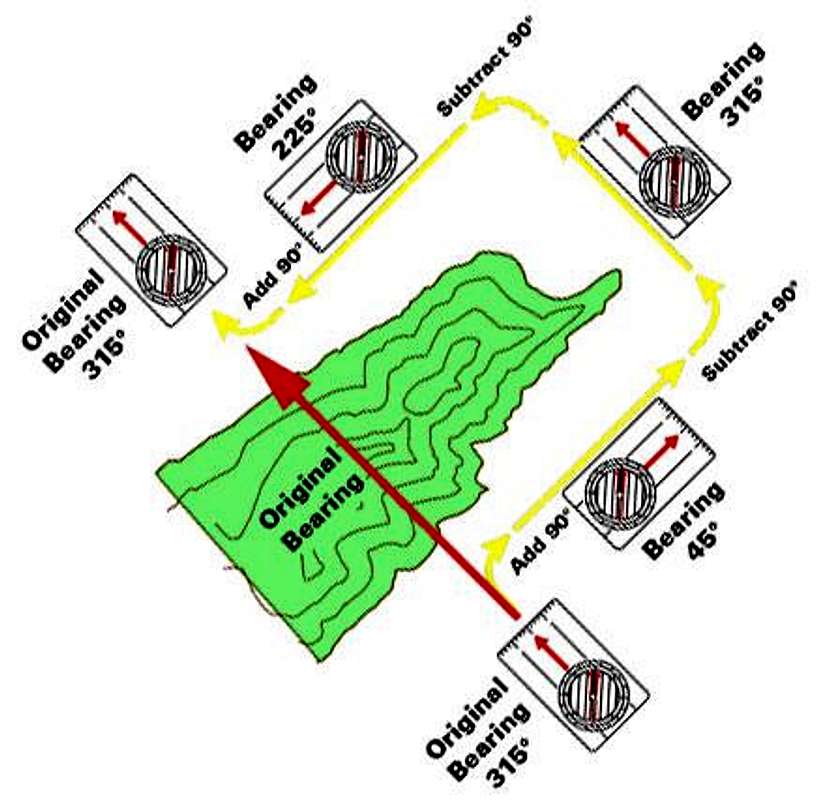
If the obstacle is too large for the previously described method, or you are on a solo trip, you can use right-angles to maneuver the obstacle. To do this turn 90 degrees and walk across the front of the obstacle while counting your steps. To make a 90 degree turn without changing the bearing setting on your compass, simply turn your body until the red end (north end) of the magnetic needle points at the West marking (to turn right) or East (to turn left), as opposed to the normal North marking. Once you’re past the front of the obstacle turn 90 degrees again, by rotating your body until the red end of the magnetic needle is over the orienting arrow, and walk past the obstacle. Once past the obstacle, turn 90 degrees for a third time (by pointing the red end of the magnetic need at the opposite marking or your first 90 degree turn), and walk the same number of steps you counted to get past the front of the obstacle. Once the steps are up, turn your body to align the magnetic needle back over the orienteering arrow (thus turning 90 degrees for a fourth and final time), and you will be back on course.
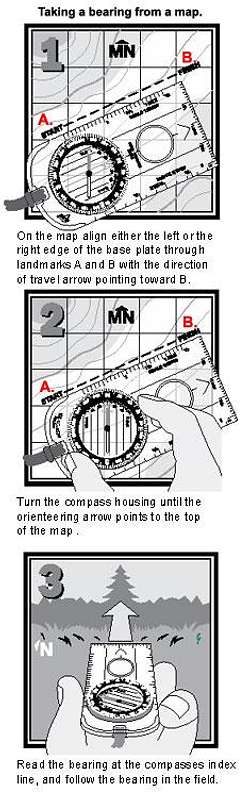
Bearings can also be calculated from a topographic map, and then used in the field. Assume you know you are at landmark A in the field, and you want to travel to landmark B, but you can’t see it. If you have a topographic map and you can identify both landmarks on the map, you can use you compass with the map to get a bearing thus enabling you to travel accurately to landmark B. On the map align either the left or the right edge of the base plate through landmarks A and B with the direction of travel arrow pointing toward B. If the base plate edge isn’t long enough to reach both landmarks simply extend it with any straight edge (for example a piece of paper), or draw a straight line between the points and align the compass edge with the line. Without moving the base plate turn the compass housing until the orienteering arrow points to the top of the map (remember that north is at the top of the map). If you are lucky enough to have one of the maps north/south grid lines visible under the compass housing you can align the meridian lines on you compass with the maps north/south grid line as you turn the housing until the orienteering arrow points to the top of the map. Now, read the bearing at the compasses index line, and follow the bearing in the field! See the figure below.
A word of caution: map bearings and field bearings can differ in the USA by as much as 30 degrees east and 20 degrees west. This difference is called declination, and is explained briefly in the “Crash Course” above. The figure below has a map with magnetic north lines, rather than true meridian lines, and thus declination is not a factor.
All of the above content (minus the crash course) is taken from summitpost.org.
Getting Lost
One of the more disconcerting events occurring on a trip is the realization that you are lost. Getting confused about where you are is a common occurrence, and getting lost is the next step in a trajectory that may lead up to a condition called “Woods Shock.” Woods Shock occurs when a person’s ability to coordinate his/her mental map of what they should be seeing and experiencing is different from what they are seeing and experiencing, resulting in complete loss of spatial orientation. This confusion results in a severe loss of judgment.
As a FOP leader, you will get confused. What is important is taking the time to calmly reorient yourself before pushing on too far and getting lost. A whole psychology exists to explain how people get lost. With awareness, leaders may avoid the conditions that accelerate confusion and lead to a dangerous situation.
Leaders need to be aware of the idea of ‘mental lock,’ where you believe you are at one spot and then make the terrain fit the map. This common occurrence is called “bending the map.” You are trying to make it fit into your conception and in doing so, you are beginning to get lost.
Avoid panicking and feeling like you have to turn to risky options to get out of a situation. Stay calm and make a reasonable and safe plan.
Getting Un-Lost
Do not rush ahead to figure out where you are; STOP and figure it out. If you have gotten severely lost, you have a few tasks - to find a place to stay put, make a good campsite, and prepare for a long stay. The seven-point checklist for survival used by the Air Force is as follows in order of necessity:
- Positive mental attitude
- Apply first-aid
- Create a shelter
- Build a fire (for warmth and signaling)
- Signaling
- Water
- Food
People tend to think of food first and attitude last, but in a survival situation you need to be mentally healthy - attitude comes first!
Since FOP has route plans, and expected times of arrival - when you do not come out, people will come looking for you. Know that people will be searching for you. Your job is to keep people as safe as you can while making it easy for people to find you. Rick Curtis, our friend and colleague at Princeton, offers these ideas for leaders who find themselves lost:
General guidelines for getting un-lost:
- Identify your last known position. Mark the current time, check with all group members about what they remember since that point, including landmarks, trail junctions, and signs.
- Determine how long it has been since your last known position. Subtract the time for any lunch or meal breaks to calculate your total hiking time since your last known position.
- Estimate your hiking speed and try to include time for ascents and descents.
- Using your last known position and the estimated elapsed hiking time; you should be able to determine how far you could have traveled - creating a radius of travel. Draw a circle with a slightly larger radius (to account for inaccuracies in your estimates) on your map. This represents the possible area that you are in. You may be able to eliminate certain possibilities based on the topography. For example, there may be obvious baselines such as rivers and roads. If you have not crossed these, then at least you know where you have not been. Systematic elimination of where you aren’t helps identify where you are.
- Look for any major landmarks or terrain features around you. See if you can locate those features on the map. With the map orientated, you may be able to determine a rough location with respect to local landmarks. It’s essential that you be sure about you landmarks - do not force the landmarks to fit the map.
- If you can identify two landmarks, you should be able to find out your location using a compass and triangulation.
Staying Found
In Camp
One of the more dangerous ways people get lost is when they wander off from camp and are unable to find their way back. When a FOP group gets into camp, look around at the landmarks. Point out to everyone in the group where you are and encourage them to stay found - getting lost is almost always a symptom of under- estimating the woods and overestimating yourself. Pointing out landmarks that will help people return from a hike with the trowel to make a “long distance telephone call” will greatly help your FOPpers to stay found.
Hiking
While hiking, staying found is a product of using time control plans. With your route plan, develop expectations. When your time or the physical features do not conform to expectations - figure out what happened.
Leave camp early each day so you have the time to get “confused” and get “unconfused.” Late groups put themselves in situations where everything needs to go perfectly, adding pressure to a situation. Groups that need to rest should do so after getting to camp, not before leaving camp as a general rule.
Knowing where you are on the map at all times is a habitual behavior that leaders need to develop. Look ahead of the map and see what features you will come across. Look to a feature like a stream crossing and when you get to the stream, take the map out and create another expectation. Many mistakes occur when map reading and “sense making” is taken for granted. Humans have a dangerous capacity for the illusion of being oriented to the land.